Showing posts with label summer. Show all posts

Popsicle Stick Lizard Craft


Here's a cute lizard craft made from 2 Popsicle sticks or craft sticks and some pipe cleaners. You can change the color scheme as you like.

Materials:

  • Popsicle sticks or colored craft sticks(You can pint them yourself or buy colored ones)
  • glue
  • tape
  • scissors
  • pipe cleaners
  • google eyes
  • black marker

Directions:

  1. Cut two, 2 inch lengths of pipe cleaner to make the legs. Cut four, 1 inch lengths. Wrap the 1 inch piece around the end of the leg piece and twist once. Flatten out to make 3 toes. Repeat on the other end. It helps to make a lot of legs in advance before doing the craft in class.
  2. Cut a 3-4 inch piece for the tail and add a curl.
  3. Generously glue the leg and tail pieces to one of your colored craft sticks.
  4. Sandwich another stick on top. Push down and allow to dry. You could also substitute tape to cut down on time.
  5. Take a marker and decorate the top to look like scaly skin.
  6. Glue on 2 google eyes.
You have read this article animals / spring / summer with the title summer. You can bookmark this page URL http://tangrila.blogspot.com/2012/09/popsicle-stick-lizard-craft.html. Thanks!

Recycled Newspaper Tree Craft


This is a simple and easy recycled newspaper tree craft. It could also be a great Earth Day craft.

Materials:
  • sheet of paper
  • old newspaper
  • pencil
  • scissors
  • glue

Directions:

  1. Fold a sheet of newspaper in half. From the fold, draw the outline of half a tree trunk.
  2. Cut out the trunk and unfold.
  3. Fold the newspaper several times accordion style. Draw a simple leaf shape and cut out as many leaves as you need, about 15-20 leaves per tree. The more colorful, the better.
  4. First glue the trunk and then the leaves on a sheet of paper.


You have read this article Earth Day / recycled crafts / summer / tree craft with the title summer. You can bookmark this page URL http://tangrila.blogspot.com/2012/08/recycled-newspaper-tree-craft.html. Thanks!

Summer Beach Sand Fingerpainting Craft


Here's a cute summer beach scene craft made with sand paint. I really love the idea of mixing sand with paint. It gives it such a neat texture for fingerpainting. Some kids may not like it at first, but they usually come around after a little bit. Sand is usually colored yellow for a beach, but for this craft, I really wanted to make blue sand like the water washing up on the beach.

Materials:

  • yellow construction paper
  • sand
  • blue paint
  • shallow trays
  • small crab cutout
  • glue

Directions:

  1. Put blue paint into shallow trays and mix sand with the paint.
  2. Put a big glob of sandy paint on the yellow construction paper and let kids spread it around with their fingers. Leave a strip of yellow at the top for the beach. Allow to dry.
  3. Cut a little crab or other sea creature and glue on your beach scene.

You have read this article beach / fingerpainting / fish / sea / summer with the title summer. You can bookmark this page URL http://tangrila.blogspot.com/2012/08/summer-beach-sand-fingerpainting-craft.html. Thanks!

Straw Cartesian Diver Toy Craft

Here is an excellent instructional video from sciencetoymaker.com on making a simple and inexpensive Cartesian diver experiment from a straw and some paper clips. The video is not only clear and step by step, but also explains the science behind it as well as trouble shooting and how to handle a big class project. This is a great science craft project or summer school activity. There are other variations. I saw where you can color and cut out a sea creature from a plastic file and tape to the straws. The key to the diver is that it needs to be weighted and just barely float. I also saw diver from a plastic pipette. Put a little plastic skirt on it and make a squidy diver. There are also divers that spin.


You have read this article bottle / recycled crafts / science / sea / summer with the title summer. You can bookmark this page URL http://tangrila.blogspot.com/2012/08/straw-cartesian-diver-toy-craft.html. Thanks!

Cartesian Diver Toy Craft


I remember having a Cartesian diver toy when I was a kid. Now, you can make your own. This Cartesian diver craft comes from a Japanese site and has photos and instructions in English and Japanese. One advantage of living in Japan is when you buy sushi at a supermarket, it always includes a little soy sauce packet. These are often little plastic tubes shaped like fish. They have a resealable screw on cap and are perfect for making the little Cartesian divers. You can also buy them at the store. They need a little weight at the bottom like a nut and need enough air inside to just barely float to the surface. Put them in a sealed plastic bottle full of water. When you squeeze the bottle, they sink. You can also get fancy with some divers with little hooks and try to snag weights on the bottom like a game. Visit this site today for the full tutorial, have fun.

Cartesian diver
You have read this article bottle / fish / recycled crafts / science / summer with the title summer. You can bookmark this page URL http://tangrila.blogspot.com/2012/08/cartesian-diver-toy-craft.html. Thanks!

Plastic Bottle Fish Lantern Craft


This is a really cool looking recycled plastic bottle fish lantern craft I found on a Japanese blog. They used a 2 liter plastic drink bottle. Unfortunately, there is no description of how the craft was made. It looks as if they glued green tissue paper strips all over the bottle. The fins and mouth appear to be other pieces of plastic likewise covered in tissue paper and glued on. The eyes might be painted bottle caps. It's a great idea. You could put a string of Christmas lights inside to make a lantern. It makes you think what other things you could make with the same idea. Follow the link below to see some other pictures including a blue fish. Have fun.

Wagama My Life
You have read this article fish / Japanese crafts / lantern / recycled crafts / sea / summer with the title summer. You can bookmark this page URL http://tangrila.blogspot.com/2012/08/plastic-bottle-fish-lantern-craft.html. Thanks!

Plastic Bottle Double Pinwheel Craft 3


This is an advanced version of the plastic bottle pinwheel craft from Japan. Pinwheel in Japanese is "Kaze Guruma" which means, "wind wheel". This double pinwheel version is a little difficult but the results are impressive. You don't have to go all the way with the spray paint job, but it looks great.

Materials:
  • 2 plastic drink bottles(500 ml, 17 oz.)
  • a small drill
  • paint
  • box cutter or exacto knife
  • wire coat hanger or other hick wire
  • wire cutters
  • big beads
  • hot glue gun

You don't have to understand Japanese. This site has an excellent step-by-step picture tutorial. Just follow the pictures. This is a great summer craft or Earth Day craft.

Pet Bottle Kazeguruma
You have read this article bottle / Earth Day / Japanese crafts / recycled crafts / science / summer / toy with the title summer. You can bookmark this page URL http://tangrila.blogspot.com/2012/08/plastic-bottle-double-pinwheel-craft-3.html. Thanks!

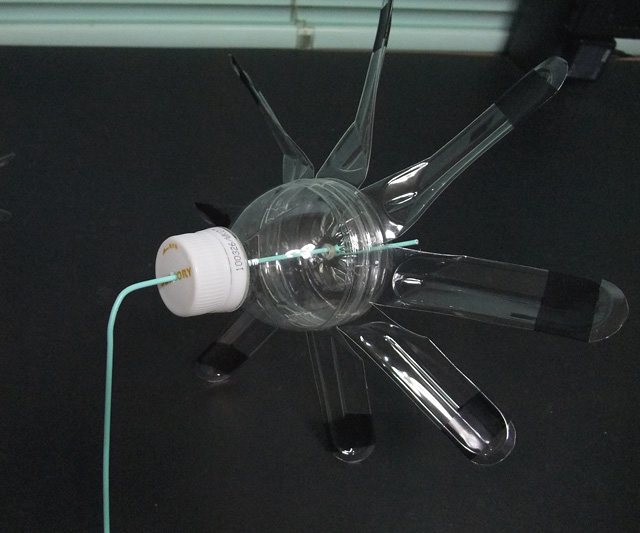
Recycled Plastic Bottle Pinwheel Toy Craft


This recycled plastic drink bottle pinwheel craft idea comes from a Japanese website. Recycle your trash into a cute pinwheel. Farmers in Japan make these all the time and put them in their fields. They're not only decorative and fun, but help scare away the birds. The website has a full picture step by step tutorial.

Materials:
  • 500 ml(about 17 oz.) plastic drink bottle with cap. You need a straight kind with flattened side panels.
  • wire coat hanger or other bendable wire
  • black electrical tape
  • scissors
  • exacto knife
  • small drill or soldering gun to make a hole.

Directions:

  1. Drill or burn a small hole exactly in the center of the cap and the bottom of the bottle.
  2. Cut the bottom part of the plastic bottle off as shown in the picture and set aside.
  3. Cut apart and bend down the side panels. There should be 8. These will be the blades of the pinwheel.
  4. Bend each blade slightly to make them curved.
  5. Insert the bottom part of the bottle on the pinwheel. Tape in place if necessary.
  6. Put black tape on the ends of the blades for decoration and added weight. Decorate your pinwheel as you like.
  7. Insert the wire through the cape and through the bottom and bend a loop to secure.
  8. Bend the long end of the wire and attach to a pole or stick.

Tomononekko
You have read this article bottle / Earth Day / Japanese crafts / recycled crafts / science / summer / toy with the title summer. You can bookmark this page URL http://tangrila.blogspot.com/2012/08/recycled-plastic-bottle-pinwheel-toy.html. Thanks!