Easy Cloth Fall Leaf Craft

This is a very easy fall leaf craft for the youngest students.

Materials:
  • leaf cut out from yellow paper
  • various cloth scraps cut into small squares
  • glue

Directions:

  1. Beforehand, trace and cut out little fall leaf shapes from yellow paper like the one shown.
  2. Glue on small squares of various kinds of cloth.


You have read this article fall / leaves with the title December 2011. You can bookmark this page URL http://tangrila.blogspot.com/2011/12/easy-cloth-fall-leaf-craft.html. Thanks!

Igloo Paper Craft

This is an easy and cute igloo craft for a winter theme.

Materials:

  • black construction paper
  • white paper
  • cotton batting
  • scissors
  • glue

Directions:

  1. Trace and cut out an igloo shape from black construction paper.
  2. Cut out small square shapes from white paper and glue them on the igloo in lines to create a blocked effect.
  3. Cut out a large oval from white paper.
  4. Glue cotton batting at the bottom of the oval for snow.
  5. Glue the igloo on top of the oval.
Afterward, I thought this would look good with light blue constuction paper instead of black after looking at pictures of real igloos.


You have read this article winter with the title December 2011. You can bookmark this page URL http://tangrila.blogspot.com/2011/12/igloo-paper-craft.html. Thanks!

Polar Bear on Ice Craft

This is an easy and cute polar bear craft.

Materials:

  • 2 sheets of white paper
  • 1/2 a sheet of light blue construction paper
  • glue
  • scissors
  • scrap cardboard
  • black marker
Directions:

  1. Draw a simple "U" shaped polar bear body and a head on white paper as shown.
  2. Carefully tear out the bear body and head along the lines.(Use scissors to make little cuts to start a difficult tear)
  3. Draw details of eyes, nose, and claws on the bear.
  4. From another paper, tear out a rectangular shape for a piece of ice.
  5. Glue the ice piece onto the blue construction paper and glue the body on top of that.
  6. Cut a square from cardboard small enough to fit behind the bears head and cut a piece of white paper to fit on top.
  7. Glue the cardboard square to the polar bear's body and glue the head on top to make a slight 3D effect.


You have read this article animals / arctic animals / bear / winter with the title December 2011. You can bookmark this page URL http://tangrila.blogspot.com/2011/12/polar-bear-on-ice-craft.html. Thanks!

Santa Ornament Conehead Craft

This is an adorable little Santa you can make with two cones.

Materials:

  • 1 large  half circle from pink or peach construction paper(about 8 inches long)
  • 1 small half circle from red construction paper(about 4 inches long)
  • cotton batting
  • glue
  • tape
  • string
  • red and black marker

Directions:

  1. Fold the two half circles into cone shapes and tap in place.
  2. Glue the small red cone on top of the big pink one. You may have to secure with a piece of tape in the back.
  3. Draw two black eyes and a red nose(for younger students, you could glue on eye and nose pieces)
  4. Glue on cotton batting above the eyes for eyebrows and at the bottom for a beard.
  5. Make a loop with a short piece of string and thread through the top of the cone Santa. Secure with tape on the inside.
You have read this article christmas / christmas ornaments / Santa / winter with the title December 2011. You can bookmark this page URL http://tangrila.blogspot.com/2011/12/santa-ornament-conehead-craft.html. Thanks!

Easy Triangle Christmas Tree Craft

This is a very easy Christmas tree craft my daughter did at school that can also be a geometry lesson.
Materials:

  • 1 sheet of white paper
  • 1 large green paper square
  • 1 small green paper square
  • scissors
  • glue
  • markers or crayons

Directions:

  1. Fold the two green squares in half from corner to corner and cut on the fold to make two big triangles and two small triangles.
  2. Glue the triangles on the white paper to make a tree.
  3. Take markers and draw a trunk, pot, ornaments, and other details to your tree.

You have read this article christmas / christmas tree / Japanese crafts with the title December 2011. You can bookmark this page URL http://tangrila.blogspot.com/2011/12/easy-triangle-christmas-tree-craft.html. Thanks!

Snowman Chain Paper Craft

Here's a variation on paper dolls chain, paper snowmen.

 
Materials:

 
  • 1/2 a sheet of 12"x18" white construction paper
  • pencil
  • ruler
  • crayons
  • scissors
 
Directions:

 
  1. Start with a 6"x18" strip of white construction paper. Use a ruler and pencil to divide the strip into 3" wide sections.
  2. Accordion fold the paper on the lines.
  3. Draw a snowman with hat outline on the top of the folded paper. The arms should extent to the sides of the 3"sections.
  4. Cut around the shape, but don't cut around the end of the arms.
  5. Unfold and decorate your snowmen with faces, buttons, scarves, etc.
  6. Display on the bulletin board or wall.
You have read this article christmas / snowman / winter with the title December 2011. You can bookmark this page URL http://tangrila.blogspot.com/2011/12/snowman-chain-paper-craft.html. Thanks!

Candle Wax Resist Snowman Christmas Craft


Here's a twist on the usual snowman using a candle to make a water resistant surface and then paint.

Materials:

  • 1/2 a shet of 9"x12" white construction paper
  • 1 white candle
  • 3 buttons
  • 2 short pieces of white pipe cleaner(wikki sticks)
  • 1 short piece of black pipe cleaner
  • 2 google eyes or eye stickers
  • black and orange construction  paper scraps
  • dark blue tempur paint and brushes
  • pencils, scissors, glue

Directions:

  1. On a 9"x6" piece of white construction paper, draw a snowman standing in snow.
  2. Rub the candle like a crayon all over the snowman and snow. Draw dots of snow in the sky.
  3. Paint the whole paper with dark blue paint. The paint won't stik to where you colored with crayon. Allow to dry.
  4. Draw and cut out a black hat and orange nose from scrap construction paper. Glue on to the snowman.
  5. Glue on buttons on the body, 1 piece of black pipe cleaner for a mouth, and 2 pieces of white pipe cleaners for arms.
Art-Just Do It


    You have read this article christmas / snowman / winter with the title December 2011. You can bookmark this page URL http://tangrila.blogspot.com/2011/12/candle-wax-resist-snowman-christmas.html. Thanks!

    Winter Tree Silohouette Window Craft

    This is a cool winter silhouette craft to hang in the window.

    Materials:

    • 9"x12" piece of cardboard
    • black construction paper
    • light blue tissue paper
    • waxed paper
    • glue
    • scissors and box cutter.

    Directions:

    1. Beforehand, cut a rectangle from the center of the 9"x12" cardboard, to make a 1" thick frame.
    2. Glue a sheet of black construction paper onto the frame and cut out the middle to make a black front to your frame.
    3. On the back of the frame glue on a large piece of light blue tissue paper.
    4. Add more glue and glue on a piece of waxed paper over the tissue paper.
    5. Cut the excess of the outside of the frame.
    6. Cut a tree trunk and branch pieces from black construction paper.
    7. Glue on the trunk and branches onto the blue tissue paper on the front side of the frame.
    8. Hang the picture frame in a window, so the light shines through the back of the waxed paper.
    You have read this article sun catcher / tree craft / winter with the title December 2011. You can bookmark this page URL http://tangrila.blogspot.com/2011/12/winter-tree-silohouette-window-craft.html. Thanks!

    Silver Christmas Aluminum Foil Scene Craft

    This craft has a cool silvery effect. Good for a winter or Christmas scene.

    Materials:

    • heavy-duty aluminum foil sheet, about 5"x8"
    • sheet of dark blue construction paper, about 9"x6"
    • silver marker
    • soft pencil
    • black paint and paintbrushes
    • paper towels
    • newspaper
    • glue

    Directions:

    1. Fold several sheets of newspaper to make a padded work surface.
    2. Place the sheet of aluminum foil o the newspaper and draw a Christmas tree or other wintry scene with a soft pencil, pressing gently into the foil.
    3. Lightly brush black paint onto the foil.
    4. Dab and wipe off the excess paint with a damp paper towel. Allow to dry.
    5. Glue the foil picture onto a piece of dark blue construction paper.
    6. Use a silver marker to decorate the border of the construction paper with little silver dots or stars.

    You have read this article christmas / christmas tree / foil / winter with the title December 2011. You can bookmark this page URL http://tangrila.blogspot.com/2011/12/silver-christmas-aluminum-foil-scene.html. Thanks!

    Lantern Plastic Cup Decoration Craft

    This is a simple and easy lantern decoration you can make for your next party.

    Materials:

    • 2 tall clear plastic cups
    • mylar tape, hologram tape, or other reflective tape
    • string
    • push pin or other sharp implement
    • colored electrical tape
    • markers

    Directions:

    1. Use a push pin or other sharp implement to poke a hole in the bottom of two plastic drink cups.
    2. Thread a piece of long string through the hole in one cup. Make a knot on the inside so it doesn't come out. This is the top of the lantern to hang up.
    3. Thread a short piece of string through the hole in the other cup, tie a knot and tape a piece of mylar tape to the end that hangs down. This is the bottom of the lantern.
    4. Cut a long piece of mylar or reflective tape, enough to fill both cups.
    5. Tape the two cups together with electrical tape or other colorful tape, with the mylar inside.
    6. Decorate the outside with markers.
    7. Hang up your festival lanterns.


    You have read this article cups / summer with the title December 2011. You can bookmark this page URL http://tangrila.blogspot.com/2011/12/lantern-plastic-cup-decoration-craft.html. Thanks!

    Easy Paper Plate UFO Craft

    This is a simple and fun UFO craft you can do when teaching about space or transportation.

    Materials:

    • 2 paper plates
    • white paper
    • crayons
    • reflective tape
    • clear plastic pudding cup
    • glue
    • scissors

    Directions:

    1. Decorate the bottom of 2 paper plates to look like a UFO.
    2. Cut several short strips of reflective tape.
    3. Glue the strips around the rim of one paper plate.
    4. Sandwich and glue together the 2 paper plates like a Frisbee with the strips of reflective tape sticking out around the rim to make your UFO.
    5. Draw and cut out a cute alien.
    6. Tape the alien on the inside of a cleaned out pudding cup.
    7. Tape the pudding cup upside down on top of your UFO with the alien looking out to make the cockpit.
    8. Hang your UFO from the ceiling.

    You have read this article paper plate / space with the title December 2011. You can bookmark this page URL http://tangrila.blogspot.com/2011/12/easy-paper-plate-ufo-craft.html. Thanks!

    Phases of the Moon Craft

    This is a very simple idea to teach the phases of the moon and their names.

    Materials:

    • sheet of black construction paper cut in half lengthwise
    • outlines of moon phases and their names
    • yellow crayon
    • scissors
    • glue

    Directions:

    1. Prepare simple drawings of the four main phases of the moon and their names: full moon, half moon, crescent moon, and sliver.
    2. Students cut out moons and names.
    3. Fold black paper in half and then half again to make four equal sections.
    4. Students glue on the moons in correct order and the names below.
    5. Color the moons yellow.
    6. Don't forget to teach them new moon, you can't see it.
    You have read this article moon / space with the title December 2011. You can bookmark this page URL http://tangrila.blogspot.com/2011/12/phases-of-moon-craft.html. Thanks!

    Acorn Tops Toy Craft

    This idea cam from my daughter's first grade elementary school textbook in Japan. All Japanese students make these.

    Materials:

    • acorns
    • toothpicks
    • hard rough surface
    • sharp tool like to punch holes in leather
    • modeling clay

    Directions:

    1. Holding the acorn tightly, scrape the top against a hard rough surface like concrete or pavement. File off the top layer of the acorn to reveal the nut.
    2. Stick the acorn into a hick, hard piece of clay for a base.
    3. Using a very sharp tool for making holes, make a small hole into the top of the acorn WARNING: This is a very dangerous tool! You may have only the teacher do this step.
    4. Break a toothpick in half and insert it into the top of the acorn to make the top handle.
    5. Spin your acorn top.

    You have read this article acorns / Japanese crafts with the title December 2011. You can bookmark this page URL http://tangrila.blogspot.com/2011/12/acorn-tops-toy-craft.html. Thanks!

    Santa Hand Print Craft

    This is a cute hand print Santa.

    Materials:

    • sheet of blue construction paper
    • eye stickers
    • red paper Santa hat and mouth
    • white paint and brush
    • glue
    • scissors

    Directions:

    1. Paint child's hand with white paint and press onto blue paper.
    2. Turn upside down. Put on eyes, mouth and hat to make Santa. The fingers make the beard.

    You have read this article christmas / Santa / winter with the title December 2011. You can bookmark this page URL http://tangrila.blogspot.com/2011/12/santa-hand-print-craft.html. Thanks!

    Easy Snowman Paper Bag Craft

    Here's a cute, simple snowman craft you can make from a paper lunch bag.

    Materials:

    • brown paper lunch bag
    • newspaper
    • eyes, buttons, and hat cut from black construction paper
    • triangle carrot nose cut from orange paper
    • 2 craft sticks for arms
    • 2 small red paper mittens
    • white paint and brushes
    • tape
    • scissors

    Directions:

    1. Cut out all the face pieces beforehand. For the hat, cut out on the fold, so you have two shapes connected in the middle like a tent.
    2. Take a brown paper lunch bag and stuff it with newspaper scraps. Tape the end closed.
    3. Paint the whole bag white.
    4. Stick on eyes, buttons, and nose.
    5. Tape the hat to the top.
    6. Tape the mittens on the end of craft sticks. Cut two small holes in the sides of the snowman and stick in the arms. After dry, secure with tape.
    7. Display your little paper bag snowmen.

    Variations:

    You could give your paper bag snowman a red Santa hat instead. You could also tie a ribbon around for a scarf.


    You have read this article christmas / paper bag / snowman / winter with the title December 2011. You can bookmark this page URL http://tangrila.blogspot.com/2011/12/easy-snowman-paper-bag-craft.html. Thanks!

    Japanese Chopsticks Catapult Toy Craft

     Here's a fun toy you can make from disposable chopsticks and rubber bands to launch an acorn or small ball or marble into a cup.

    Materials:

    • 2 sets of disposable chopsticks(the kind that are fused together)
    • 2 short lengths of a chopstick, cut and taped together
    • rubber bands
    • drink bottle cap
    • tape
    • ammunition(acorns, super balls, marbles)

    Directions:

    1. Using a box cutter, score and break off 2 short pieces from a chopstick(about 1 inch long). Tape together to make the fulcrum for the spring.
    2. Place 2 sets of disposable chopsticks on top of each other and tie the small ends with rubber bands and cover with tape.
    3. Place the fulcrum between them bout 2 inches from the end and tie several times with rubber bands.
    4. Tape a drink bottle lid near the big end of the chopsticks.
    5. Place an acorn in the lid, press down on the chopsticks and try to shoot the acorn into a cup.
    You have read this article acorns / Japanese crafts / toy with the title December 2011. You can bookmark this page URL http://tangrila.blogspot.com/2011/12/japanese-chopsticks-catapult-toy-craft.html. Thanks!

    Snowman with Hat and Scarf Craft

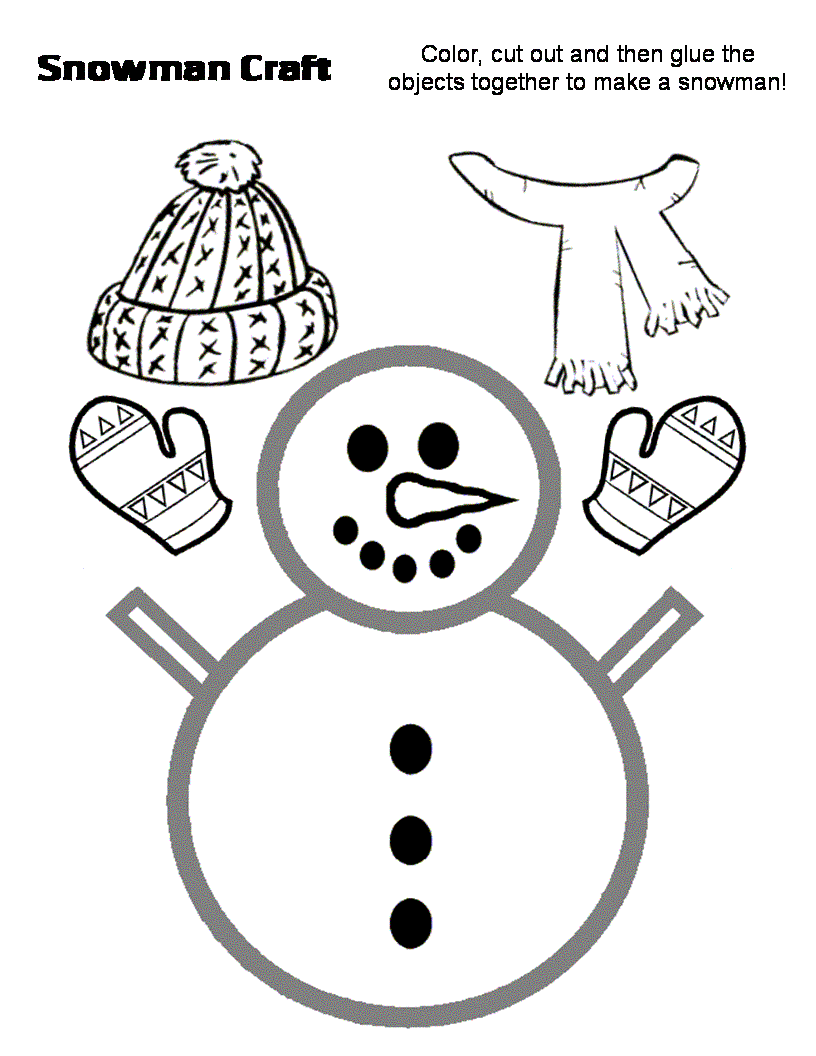
    This cute snowman has three different hats and scarves. Kids can play dress up and switch. Good for a unit about clothes. Older kids can try and discover how many combinations there are. (The answer is 9)

    Materials:

    • sheet of light blue construction paper
    • snowman cut outs
    • set of three different hats and scarves to cut out or pre-cut to save time
    • glue
    • scissors
    • tape

    Directions:

    1. Create snowman template and three hats and scarves
    2. Talk to the students about snowmen. Read a book or sing Frosty the Snowman. Talk about a snowman's clothes.
    3. Students can color and cut out hats and scarves or teacher does it beforehand. Or make them from colored construction paper. Put tape on the back to stick.
    4. Glue the snowman to the blue paper.
    5. Put tape on top of the head and neck of the snowman to act as a laminae.
    6. Kids mix and match the hats and scarves.

    Variations:

    This craft can be used in many ways, to teach color matching, winter, clothes, and math. Make a laminated set to keep in the class for kids to use at play time.

    Here's a template to use:
    http://www.eslkidstuff.com/Worksheets/snowmancraft.gif


    You have read this article christmas / clothes / math / snowman / winter with the title December 2011. You can bookmark this page URL http://tangrila.blogspot.com/2011/12/snowman-with-hat-and-scarf-craft.html. Thanks!

    Frog Life Cycle Craft

    This is a cute craft about frogs and tadpoles, good follow up to teaching about the life cycle of frogs or reading the story "Fish is Fish" by leo lionni.

    Materials:

    • sheet of white paper
    • little frogs and Lilly pads cut from coloring pages
    • bubble wrap
    • blue paint with brushes
    • black marker
    • scissors
    • glue
    • crayons

    Directions:

    1. Color and cut out frogs and Lilly pads from coloring page, 2 per child.
    2. Draw two small tadpoles on paper(just a black oval with a tail) with a marker
    3. Brush blue paint over bubble wrap.
    4. Press paper on bubble wrap for pond effect.
    5. Glue on lily pads with frogs sitting on top.


    You have read this article bubble wrap / fish / frog / sea with the title December 2011. You can bookmark this page URL http://tangrila.blogspot.com/2011/12/frog-life-cycle-craft.html. Thanks!

    Christmas Trees in Snow Scene Craft

    This is a great looking winter craft using bubble wrap to make snow.

    Materials:

    • sheet of dark blue construction paper
    • colorful Christmas wrapping paper
    • bubble wrap
    • white paint and bushes
    • scissors, glue
    Directions:

    1. Trace and cut out a simple Christmas tree shapes from Christmas wrapping paper.
    2. Brush white paint over bubble wrap.
    3. Press blue paper down on bubble wrap to make snow scene.
    4. Glue on Christmas trees to snow scene. Display
    You have read this article bubble wrap / christmas / christmas tree / tree craft / winter with the title December 2011. You can bookmark this page URL http://tangrila.blogspot.com/2011/12/christmas-trees-in-snow-scene-craft.html. Thanks!

    Hand Print Fall Tree Craft

    Here's a cute hand print tree craft for fall.

    Materials:

    • sheet of white paper
    • brown, green, yellow, and orange paint
    • brushes and shallow dishes
    • fingers

    Directions:

    1. Using a brush, coat child's hand and arm with brown paint.
    2. Press onto white paper to make trunk and branches. Wash hands and arms.
    3. Come back and dip fingers in green, yellow, and orange paint and take turns making falling leaves around the tree. Allow to dry.

    The same concept could be used for trees of other seasons, or you could glue on paper leaves instead.


    You have read this article fall / fingerpainting / hand print / tree craft with the title December 2011. You can bookmark this page URL http://tangrila.blogspot.com/2011/12/hand-print-fall-tree-craft.html. Thanks!

    Easy Hand Print Elephant Craft.

    This is an easy and cute elephant you can make from a hand print cut out.

    Materials:

    • sheet of blue construction paper
    • small blue construction paper oval
    • crayons or colored pencils
    • short piece of blue yarn
    • tape
    • glue

    Directions:

    1. Trace and cut out one hand print from blue construction paper.
    2. The fingers are the legs, the thumb is the trunk. Draw an eye, details on the trunk, and a carpet pattern over the back for the saddle.
    3. Fold the paper oval in half lengthwise. Put glue only on one side and put on the front for the elephant's ear.
    4. Tape a short length of string on the back for a tail.


    You have read this article animals / elephant / hand print with the title December 2011. You can bookmark this page URL http://tangrila.blogspot.com/2011/12/easy-hand-print-elephant-craft.html. Thanks!

    Easy Glass Jar Snow Globe Craft

    This is an easy home made snow globe you can make from an old jar.

    Materials:

    • small glass jar with lid
    • white plastic bag
    • glitter
    • small plastic toy or eraser toy(one that sinks in water)
    • scissors
    • water

    Directions:

    1. Cut a small part of a white plastic bag into tiny pieces.
    2. Fill jar with water. Add the plastic pieces, glitter, and small toy and then tightly screw on the lid.
    3. Shake your snow globe and watch the pieces slowly settle to the bottom.

    You can select a toy for any theme or holiday.


    You have read this article bottle / christmas / sea with the title December 2011. You can bookmark this page URL http://tangrila.blogspot.com/2011/12/easy-glass-jar-snow-globe-craft.html. Thanks!

    Valentine's Day Giant Chocolate Kiss Craft

    This is is a very simple Valentine's Day craft. Great for chocolate lovers.

    Materials:

    • large chocolate kiss shape cut from a cereal box
    • large sheet of aluminum foil
    • markers
    • paper banner for the top

    Directions:

    1. Draw and cut a large chocolate kiss shape from the back of a cereal box.
    2. Wrap completely in aluminum foil. Secure with tape if necessary.
    3. With markers, draw a smiley face on the front.
    4. Tape a little banner to the top of the kiss with student's name or short message.
    You have read this article valentine's day with the title December 2011. You can bookmark this page URL http://tangrila.blogspot.com/2011/12/valentine-day-giant-chocolate-kiss-craft.html. Thanks!

    Easy "Forkupine" Porcupine Craft

    Here's a cute and colorful porcupine craft you can make with forks.

    Materials:

    • sheet of white paper
    • black crayon or marker
    • plastic forks
    • various colored paints
    • small trays for paint

    Directions:

    1. For the porcupine's body, simply draw a large oval and then draw a narrow triangle sticking of one side for the head. Add an eye, nose and whiskers to the triangle.
    2. Put different colored paint in small dishes each with a plastic fork.
    3. Dip the fork into the paint, then press onto the oval. repeat this all over the oval with different colors to create a rainbow, spiky patter. Allow to dry.

    You have read this article animals with the title December 2011. You can bookmark this page URL http://tangrila.blogspot.com/2011/12/easy-porcupine-craft.html. Thanks!