Showing posts with label picture frame. Show all posts

Father's Day Football Picture Frame Sports Craft

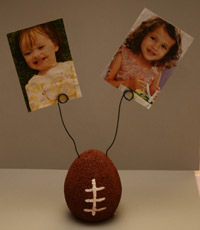
This Father's Day football picture frame is a really creative idea. I love it.

Materials:

  • Styrofoam egg
  • 18 gauge wire
  • brown paint, brushes
  • sharp knife
  • wire cutters
  • white 3D paint or white out pen
  • pencil
  • favorite photos

Directions:

  1. Cut the bottom of the Styrofoam egg so it stands up.
  2. Paint the egg brown. Allow to dry.
  3. Use white 3D paint to paint on the football laces or use a white out pen. Allow to dry.
  4. Wrap the wire around a pencil 3 times to make a spiral. Cut the wire about 5 inches below the spiral.
  5. Stick the wire into the top of the football.
  6. Insert a couple of favorite photos into the loops of the spiral.

Variations:
  1. Use a Styrofoam ball, white and red paint to make a baseball.
  2. Use orange and black paint to make a basketball.
  3. For added stability, glue the bottom of the Styrofoam ball to a square of construction paper or cardboard.


Source: All Kids Network
You have read this article father's day / picture frame / sports with the title picture frame. You can bookmark this page URL http://tangrila.blogspot.com/2012/05/father-day-football-picture-frame.html. Thanks!

Father's Day DAD Picture Frame Craft


Here's another Father's Day DAD picture frame craft. Easy to make and looks great.

Materials:

  • construction paper
  • card stock
  • "DAD" template from link below
  • scissors
  • kids photos
  • paper clips
  • glue

Directions:
  1. Print out he "DAD" template and cut out. Trace and cut out from construction paper color of choice. This will be the top of the picture frame.
  2. Trace "DAD" on card stock. Cut out around the letters slightly larger than the construction paper. The card stock shape will be the back of the picture frame.
  3. Cut the photos to fit and tape to the back of the construction paper DAD.
  4. Glue down on card stock frame.
  5. For a stand up frame, open 2 paper clips slightly under 90 degrees and tape to the back of the frame.
  6. For a hanging frame, open up a paper clip 180 degrees flat and tape to the top of the frame.
Great tutorial with video!: Max'n'Mum
You have read this article father's day / picture frame with the title picture frame. You can bookmark this page URL http://tangrila.blogspot.com/2012/05/father-day-dad-picture-frame-craft.html. Thanks!

Father's Day Popsicle Stick Picture Frame Craft

Here's a simple Father's Day Picture frame using Popsicle sticks.

Materials:

  • big Popsicle sticks(craft sticks) or tongue depressors
  • paint
  • glue
  • tape
  • child's photo
  • stickers, dazzles, foam shapes, etc.
  • markers

Directions:

  1. Use colored craft sticks or paint your own beforehand.
  2. Glue 8 colored craft sticks together to make the frame, 2 at the top and bottom, and 2 on either side. You could make a frame with 6 instead, only one on the sides for a wider frame.
  3. Decorate your frame as you like. Add a Father's Day message, like "I love my Daddy".
  4. Tape a child's picture to the back of the frame. Crop the picture as necessary.
  5. Glue magnets to the back and put on the refrigerator.
  6. Or, glue 2 short wooden dowel lengths at the bottom on the back to make a stand up frame.
 Source: All Kids Network
You have read this article father's day / picture frame with the title picture frame. You can bookmark this page URL http://tangrila.blogspot.com/2012/03/father-day-popsicle-stick-picture-frame.html. Thanks!

Mother's Day Handprint fooprint Flower Craft

The 2 craft gifts mothers love to get are flowers and hand prints. This craft is both and more. This simple Mother's Day Craft is easy to make and will leave a lasting impression.

Materials:

  • various colored construction paper
  • pencil
  • scissors
  • glue
  • cup to trace the circle
  • picture of child

Directions:

  1. Trace and cut out child's footprints from green construction paper.
  2. Cut a thick, 8" or so rectangle from green paper for the stem.
  3. Trace and cut out several hand prints from 2 different colored construction paper.
  4. Use a cup to trace a circle from yellow paper.
  5. cut out the child's face slightly smaller than the yellow circle.
  6. Glue the footprints to the bottom of the stem for leaves.
  7. Glue the hand prints in alternating colors at the top for the flower.
  8. Glue the circle in the middle and the photo in the circle.
  9. Write the year on 1 footprint and a Mother's Day message on the other.

Source: All Kids Network

You have read this article flowers / hand print / mother's day / picture frame with the title picture frame. You can bookmark this page URL http://tangrila.blogspot.com/2012/03/mother-day-handprint-fooprint-flower.html. Thanks!

Mother's Day Daffodil Picture Card Craft

This is a cute Mother's Day daffodil card mom is sure to love.

Materials:
  • sheet of white construction paper or card stock
  • green and yellow construcion paper
  • scisors
  • yellow or orange cupcake liner/baking cup
  • child's photo
  • glue

Directions:

  1. Cut a large star from yellow paper and a stem and leaf from green.
  2. Fold the white thick paper in half and glue on the stem, leaf and star.
  3. Cut child's face to match the bottm of the cupcake liner, glue in place.
  4. Glue the cupcake liner to the front of the star.
  5. Write a Mother's Day message on the front and/or inside of the card.

Source: Ceres Childcare

You have read this article flowers / mother's day / picture frame / spring with the title picture frame. You can bookmark this page URL http://tangrila.blogspot.com/2012/03/mother-day-daffodil-picture-card-craft.html. Thanks!

Mother's Day Picture Flower Craft

Here's a very easy idea for a great flower craft for Mother's Day.

Materials:

  • kids' photos
  • construction paper
  • colored craft sticks(Popsicle sticks)
  • Glue
  • laminating sheets and laminator(optional)

Directions:

  1. Cut pretty flower shapes from construction paper with the center cut out.
  2. Cut the child's photo to match the size of the flower.
  3. Glue the photo to the back of the flower so the face shows./Alternatively, keep the center of the flower, cut the face to match and glue on the front.
  4. Glue the flower to the craft stick for a stem.
  5. If desired, laminate the flower for durability before gluing to the craft stick

Hint: Clear packing tape is poor man's laminae

You have read this article flowers / mother's day / picture frame / spring with the title picture frame. You can bookmark this page URL http://tangrila.blogspot.com/2012/03/mother-day-picture-flower-craft.html. Thanks!

Mother's Day Flower Vase with Picture Craft

Mom's love flowers and kids' pictures for Mother's Day. This craft has both.

Materials:

  • toilet paper roll
  • construction paper in various colors
  • photo of child
  • white paper
  • colorful tissue paper
  • craft stick(Popsicle stick)
  • paints, brushes

Directions:

  1. Cut out 4 medium sized hearts from the color of their choice. These will form the flower. It's easier if you fold the paper and draw half a flower and cut out on the fold. Use a template if you have one.
  2. Trace and cut out a large circle and cut out the child's face from the photo.
  3. Arrange the hearts as the petals and glue to the back of the circle.
  4. Glue the photo to the front of the circle.
  5. Let kids mix blue and yellow paint to make green. Paint the white paper and craft stick. Allow to dry. This will be used to make the stem. Cut a leaf shape from the paper.(To eliminate this step, just use green construction paper and a colored craft stick)
  6. Glue the flower and leaf to the craft stick.
  7. Paint the toilet paper roll the color of their choice. Allow to dry.
  8. Write "Happy Mother's Day" on the toilet roll.
  9. Put the flower into the toilet roll and push in colorful tissue paper to keep it in place.
Source: Classified Mom


You have read this article flowers / mother's day / picture frame with the title picture frame. You can bookmark this page URL http://tangrila.blogspot.com/2012/03/mother-day-flower-vase-with-picture.html. Thanks!

Mother's Day Flower Picture Frame Craft

This is a simple and cute picture frame you can make from a paper plate that's also great for a Mother's Day gift.

Materials:

  • 1 paper plate
  • many small pink and yellow construction paper oval shapes
  • 1 long green pipe cleaner or wiki stick
  • two small green leaf cut outs
  • tape
  • glue
  • scissors.

Directions:

  1. Beforehand, cut out the center of the paper plate, the pink and yellow ovals, and the green leaf shapes.
  2. Students glue the ovals all around the back side of the paper plate for the petals.
  3. Tape the green pipe cleaner to the back of the plate for the stem and fold down the tip. (the tip of a pipe cleaner can be a little sharp)
  4. Tape the green leaves to the stem.
  5. Tape the child's favorite photo to the back of the plate.
How to cut out the center of the paper plate:

One way is to take a box cutter and cut all the way around the inside circle of a paper plate. Another easy way, is to bend the paper plate in half without folding it. Then with scissors, make a cut from the center until the rim. Use that starter cut to cut out the center in two half circle pieces. Easy.


You have read this article flowers / mother's day / paper plate / picture frame with the title picture frame. You can bookmark this page URL http://tangrila.blogspot.com/2011/10/mother-day-flower-picture-frame-craft.html. Thanks!