Showing posts with label Japanese crafts. Show all posts

Jumping Frog Clapper Toy Craft

 
This is a cute craft to my 2nd grade daughter made at her Japanese elementary school. It's a jumping frog clapper toy made from a recycled milk carton. It's a common toy for elementary school in Japan. It's fun and easy to make. Thanks Hana for helping me with this.
 
Materials:
 
  • milk carton
  • scissors
  • tape
  • 2 rubber bands
  • markers to decorate
 
Directions:
 
 
1. Cut open the milk carton and lay it flat like this. 
 
 2. Cut off the top flap and the bottom square and discard. You are left with 4 panels. Cut these in half as shown so you have a 2 sets, each with 2 panels. You can make 2 clappers from these.
 
 3. Take one, 2 panel set and fold in half lengthwise along the crease. Tape the opposite side shut.
 
 4. Now fold in half.
 
 5. Now, cut in half along the fold you just made. Tape the 2 halves back together, with just a tiny gap between. This makes for a better clap sound.
 
 6. Fold together and cut a pair of "v" shaped notches on either side like this.
 
 7. Wrap 2 rubber bands around one side in the notches, twist once and wrap around the other side.
 
 8. If you open it flat, it looks like this.
 9. Fold it over and hold down with your finger. Let go, and it will jump up and snap together. Another way, it to fold it closed and then throw into the air and it makes  loud clapping sound. Sory, it's nearly imposible to take a picture in action.  Afterward, you can decorate with markers or stickers how you like. See whose can make the loudest clap or jump the highest.
 
You have read this article frog / Japanese crafts / recycled crafts / toy with the title Japanese crafts. You can bookmark this page URL http://tangrila.blogspot.com/2012/09/jumping-frog-clapper-toy-craft.html. Thanks!

Thanksgiving Cereal Turkey Craft


This Thanksgiving cereal turkey craft idea comes from a Japanese website. The idea is very simple. Find a funny turkey coloring page online. Color the turkey and then draw big turkey tail feathers behind it if they're not already there. One by one, cover each tail feather in glue and put on a different kind of kids' cereal, pasta, or seeds. The more colorful, the better. Allow to dry.

Peekaboo
You have read this article Japanese crafts / nature / Thanksgiving with the title Japanese crafts. You can bookmark this page URL http://tangrila.blogspot.com/2012/08/thanksgiving-cereal-turkey-craft.html. Thanks!

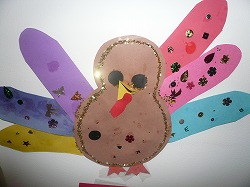
Thanksgiving Sparkly Turkey Paper Craft


Here's a simple and cute Turkey craft from a Japanese website.

Materials:

  • construction paper
  • scissors
  • spangles and/or sequins
  • glue
  • glitter or glitter glue

Directions:

  1. Cut a rounded turkey body shape from brown paper like the one shown.
  2. Cut long, oval shaped tail feathers in various colors.
  3. Glue the tail feathers to the back of the turkey.
  4. Cut out and glue on pieces for the beak, waddle, eyes, and feet.
  5. Put a line of glitter around the edge of the turkey.
  6. Glue on spangles, sequins, or other sparkly decorations.

Peekaboo
You have read this article birds / Japanese crafts / Thanksgiving with the title Japanese crafts. You can bookmark this page URL http://tangrila.blogspot.com/2012/08/thanksgiving-sparkly-turkey-paper-craft.html. Thanks!

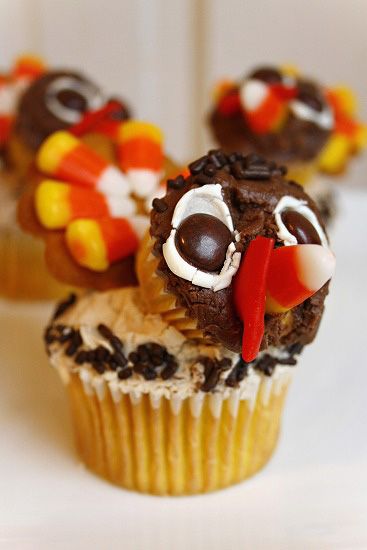
Thanksgiving Turkey Cupcakes Recipe


This cute Thanksgiving turkey cupcake recipe idea came from a Japanese website of someone living in America.

Recipe:

  • 1 big cupcake(this one's pumpkin)
  • 1 small cupcake
  • 1 cookie(this one's gingerbread)
  • icing
  • candy corn
  • sprinkles
  • M&M's or marble chocolates
  • marshmallow

Directions:

  1. Decorate the small cupcake with chocolate frosting for the head. Use a little white frosting with a M&M in the middle for the eyes. Use a candy corn for the beak. I'm not sure what they used here for the waddle, maybe a piece of fruit leather. Please experiment.
  2. Use icing to adhere candy corn on the cookie in a fan shape for the tail feathers.
  3. Decorate the big cupcake with light brown frosting and sprinkles around the edge.
  4. Cut a marshmallow in half at an angle to create a wedge and prop up the cookie tail feathers as shown above.
  5. Place the small cupcake head in front of the cookie.
  6. Ta da! Turkey cupcakes, Gobble gobble.

Chanoma
You have read this article food / Japanese crafts / recipe / Thanksgiving / Thanksgiving treats with the title Japanese crafts. You can bookmark this page URL http://tangrila.blogspot.com/2012/08/thanksgiving-turkey-cupcakes-recipe.html. Thanks!

Thanksgiving Indian Headband Craft


This great Thanksgiving Indian headband craft comes from a Japanese website. Follow the link below for a step by step picture tutorial, sorry only Japanese.

Materials:
  • construction paper
  • scissors
  • tape
  • rubber band
  • stapler

Directions:
  1. Cut a sheet of construction paper in half lengthwise.
  2. Fold both halves into thirds lengthwise to make 2 long thin strips Leave one fold on the outside to make a little pocket. Later, you'll insert the feathers into it..
  3. Insert the ends and tape together.
  4. Wrap around child's head and check. Trim the strip so it's a little smaller than child's head.
  5. Fold the ends down about an inch, insert the rubber band and staple the ends shut to make your headband.
  6. Cut a few feathers from construction paper and insert into the strip pocket. Staple in place. Staple them so, the staples aren't on the inside of the headband and don't touch the child's head.
Pigeon Hearts
You have read this article costume / Japanese crafts / native american / Thanksgiving with the title Japanese crafts. You can bookmark this page URL http://tangrila.blogspot.com/2012/08/thanksgiving-indian-headband-craft.html. Thanks!

Thanksgiving Handprint Turkey Collage Craft


This great looking Thanksgiving Handprint Turkey Collage craft idea comes from a Japanese blog.

Materials:
  • various colored construction paper
  • scissors
  • pencil

Directions:

  1. Trace and cut out child's hands on brown paper.
  2. Glue handprints onto a sheet of construction paper.
  3. Cut and glue on a piece for the waddle and draw details of eyes and wavy lines for wings.
  4. Tear colorful strips of paper and glue on for the tail feathers.


Pigeon Hearts
You have read this article collage / hand print / Japanese crafts / Thanksgiving with the title Japanese crafts. You can bookmark this page URL http://tangrila.blogspot.com/2012/08/thanksgiving-handprint-turkey-collage.html. Thanks!

Plastic Bottle Air Cannon with Smoke Craft


Here's another version of the plastic bottle air cannon craft from Japan. This one goes an extra step and adds incense sticks to make smoke so you can blow smoke rings with your bottle. Visit the site below for an excellet, and simple picture tutorial.

Materials:

  • 500 ml, 17 oz. plastic drink bottle
  • duct tape or carpet tape
  • scissors
  • an exacto knife or box cutter
  • a balloon
  • incense sticks

Directions:

  1. Make a starter slit in the plastic bottle about an inch from the bottom.
  2. Now use scissors to cut the bottom off the bottle. Be careful there are no jagged edges.
  3. On the side o the bottle, cut or burn a slit opening about 1.5 inches long.
  4. Cut the balloon about 1 to 2 inches from the opening.
  5. Stretch the balloon to completely cover the bottom of the bottle. This is the diaphragm of the air cannon.
  6. Use duct tape to secure the balloon to the bottle.
  7. Use a strip of duct tape and attach a few short incense sticks as shown in the picture on the website.
  8. Lite the incense stick and insert into the slit to fill the bottle with smoke.
  9. Place your finger over the slit. Pull back on the end of the balloon and let go to fire the air cannon and make smoke rings.

Portable Air Cannon
You have read this article bottle / Japanese crafts / science / toy with the title Japanese crafts. You can bookmark this page URL http://tangrila.blogspot.com/2012/08/plastic-bottle-air-cannon-with-smoke.html. Thanks!

Plastic Bottle Air Cannon Toy Craft


Here's a fun and easy science craft. Make an air cannon from a plastic drink bottle and a balloon. This craft comes from a Japanese site. You can shoot down paper targets. Visit the site for a full picture tutorial.

Materials:

  • 350 ml, 12 oz. plastic drink bottle
  • duct tape or carpet tape
  • scissors
  • an exacto knife or box cutter
  • a balloon

Directions:

  1. Make a starter slit in the plastic bottle about an inch from the bottom.
  2. Now use scissors to cut the bottom off the bottle. Be careful there are no jagged edges.
  3. Cut  the balloon about 1 to 2 inches from the opening.
  4. Stretch the balloon to completely cover the bottom of the bottle. This is the diaphragm of the air cannon.
  5. Use duct tape to secure the balloon to the bottle.
  6. Pull back on the end of the balloon and let go to fire the air cannon.
You ca get fancy by ttaching the bottle to a cardboard tube for a handle and make a gun. Don't forget to decorate.


    Pet bottle air cannon
    You have read this article bottle / Japanese crafts / recycled crafts / science / toy with the title Japanese crafts. You can bookmark this page URL http://tangrila.blogspot.com/2012/08/plastic-bottle-air-cannon-toy-craft.html. Thanks!