Showing posts with label cups. Show all posts

Christmas Bells Ornament Cup Craft

This great Christmas bells craft idea from Artplatter uses paper cups decorated to look like bells. This a great, simple, ornament craft for home or school. Personally, I'd add some real jingle bells on the inside. Follow the link to learn how to make this Christmas craft.

Artplatter
You have read this article christmas / christmas ornaments / cups with the title cups. You can bookmark this page URL http://tangrila.blogspot.com/2012/09/christmas-bells-ornament-cup-craft.html. Thanks!

Thanksgiving Pilgrim Hat Cups Craft


I really love this Thanksgiving Pilgrim hats cups craft idea. Use black plastic cups for the Pilgim hats with black paper rims. Use them as place makers at the Thanksgiving dinner table. Guests can use them as real drink cups, or wear them and take them home. Follow the link for the full tutorial on this fun Thanksgiving craft.

Origami Owls
You have read this article cups / party / pilgrims / Thanksgiving with the title cups. You can bookmark this page URL http://tangrila.blogspot.com/2012/08/thanksgiving-pilgrim-hat-cups-craft.html. Thanks!

Paper Cup Chinese Dragon Craft


Here are a couple of versions of a paper cup Chinese Dragon craft.

Materials:
  • paper cups
  • string
  • sharp pencil
  • scissors
  • toilet paper rolls
  • decorating materials(pipe cleaners, Styrofoam balls, colorful paper, etc.)
  • glue

Directions:

  1. Poke a hole in the bottom of all the cups with a sharp pencil.
  2. Cut the toilet rolls into short rings.
  3. Tie a big knot in a string and thread onto a paper cup so the knot is on the inside.
  4. Thread on a toilet roll ring, then another cup. The toilet roll rings allow a little space between the cups so they can move.
  5. Continue this process until your dragon is long enough.
  6. For the head, you can just decorate the last cup or cut 2 "V" shapes on either side of a cup and thread on the opposite way to make a mouth.
  7. Decorate your dragon; add colorful paper, pipe cleaner horns, eyes etc.

Go here for a PDF tutorial

Variations:
Adding the toilet roll rings adds weight to the dragon. Another alternative is punch holes on either sides and attach the cups with brass fasteners/butterfly clips.


You have read this article cups / dragon / puppet / recycled crafts / toy with the title cups. You can bookmark this page URL http://tangrila.blogspot.com/2012/07/paper-cup-chinese-dragon-craft.html. Thanks!

Halloween Paper Cup Spider Craft


Here's a really fun and easy Halloween Spider craft from the blog, Gone Bananas. This one's pretty self-explanatory. Visit the site for full details.

Gone Bananas
You have read this article cups / halloween / spider with the title cups. You can bookmark this page URL http://tangrila.blogspot.com/2012/07/halloween-paper-cup-spider-craft.html. Thanks!

Halloween Pop-Up Ghost Craft


Here's a simple Halloween pop-up ghost craft that only takes minutes, but will entertain the kids for hours. All you need is a paper cup, a paper ghost and a craft stick. Visit the site below for a step by step tutorial as well as other great Halloween ideas.

Spark and All
You have read this article cups / ghost / halloween / toy with the title cups. You can bookmark this page URL http://tangrila.blogspot.com/2012/07/halloween-pop-up-ghost-craft.html. Thanks!

Olympic Rings Flag Craft


Here's an easy Olympic rings craft in honor of the 2012 London Olympics. All you need is some paper cups and paint.

Materials:

  • 5 paper cups
  • light blue, black, red, yellow and green paint
  • 5 shallow dishes
  • white paper

Directions:

  1. Teach kids about the Olympic flag, it's colors and meaning. Each ring represents the 5 continents and there is at least one or two colors in each flag of the world.
  2. Put each color paint in a shallow dish.
  3. Press the mouth of a paper cup and press onto the white paper.
  4. Repeat for each ring in the flag.
You have read this article cups / flags / sports with the title cups. You can bookmark this page URL http://tangrila.blogspot.com/2012/07/olympic-rings-flag-craft.html. Thanks!

Spring Flowers and Vase Chopsticks Craft

This simple Spring flowers with vase craft is great for preschoolers. Use chopsticks, a paper cup, and construction paper.

Materials:
  • 2 pair of disposable chopsticks(or short dowels)
  • paper cup
  • sharp pencil
  • flowers template or draw your own
  • construction paper
  • scissors
  • tape

Directions:
  1. Trace 4 simple flower tops on colorful construction paper or draw your own and cut out.
  2. Break the chopsticks apart so you have 4.
  3. Tape the flowers to the tops of the chopsticks.
  4. Turn your paper cup upside down and poke 4 holes with a sharp pencil.
  5. Stick your flowers in the holes to make your vase. Finished.
You have read this article chopsticks / cups / flowers / Japanese crafts / spring with the title cups. You can bookmark this page URL http://tangrila.blogspot.com/2012/06/spring-flowers-and-vase-chopsticks-craft.html. Thanks!

4th of July Liberty Bell Cup Craft


This is a simple and great looking 4th of July Liberty Bell craft ready to ring in Independence Day. It's made from a paper cup and a toilet paper roll.

Materials:
  •  toilet paper roll
  • paper cup
  • marker
  • sharp pencil
  • long pipe cleaner
  • jingle bell
  • Glue

Directions:

  1. Cover the paper cup in aluminum foil inside and out.
  2. Poke 2 holes in the bottom of the paper cup with a sharp pencil. Poke 2 holes each on either side of the toilet paper roll, so you have 2 holes on the top and bottom.
  3. Fold a long pipe cleaner and insert through the top of the toilet paper roll, through the bottom and then into the paper cup. You can use the loop at the top to hang up your bell.
  4. Twist the ends of the pipe cleaner together inside the cup. Add a little glue between the cup and toilet paper roll to secure.
  5. Tie a jingle bell to the bottom of the pipe cleaner.
  6. Use a marker to write, "Liberty" on the toilet paper roll and draw the crack on the side of the bell.
  7. Hang up your 4th of July Liberty Bell craft for Independence Day.

Source: Preschool Panda
You have read this article 4th of July / cups / foil / toilet paper roll with the title cups. You can bookmark this page URL http://tangrila.blogspot.com/2012/06/4th-of-july-liberty-bell-cup-craft.html. Thanks!

Christmas Ornament Cup Craft


This is a cute little Christmas ornament craft that will look great on the tree.

Materials:

  • plastic cup(drink cup or pudding cup)
  • stiff felt for base and sign
  • string(red baker's twine was used in the picture)
  • red and white striped straw
  • green tulle
  • lollipop stick
  • silver glitter
  • tacky spray glue
  • push pin or sharp tool to poke a hole
  • silver pipe cleaner
  • scissors
  • glue


Directions:

  1. Trace the opening of the cup on stiff felt for the base. Cut outside the line to be slightly bigger than the opening.
  2. Use a push pin to poke a hole in the bottom of the cup. The one pictured here cracked, but it doesn7t really matter.
  3. Alternative: Heat a sharp metal implement over a stove like an unrolled paper clip and push the hot metal into the cup to melt a hole without cracks.(Only by an adult!)
  4. Loop a piece of string and tie a knot. Thread through the hole from the inside until the knot to make a loop fr hanging. Add a spot of glue to keep in place.
  5. Cut a piece of striped straw to fit inside the cup.
  6. Cut a small piece of rectangular felt and write, "North Pole". Wrap and glue around the top of the straw.
  7. Cut pieces of green tulle and wrap around the lollipop stick. Cut the excess off at an angle to make a Christmas tree. Wrap a tiny piece of silver pipe cleaner at the top for a star.
  8. Alternative: Instead of making a tree, simply use a fake miniature tree from a craft shop.
  9. Glue the tree and pole onto the felt circle base.
  10. Put the base in a box, spray with tacky glue and sprinkle with glitter. Allow to dry.
  11. Pipe glue all around the edge of the felt base and place the cup on top. Allow to dry.
  12. Hang your homemade ornament on the tree.


Full tutorial with photos from: Domestic Charm
You have read this article christmas / cups with the title cups. You can bookmark this page URL http://tangrila.blogspot.com/2012/06/christmas-ornament-cup-craft.html. Thanks!

Easy Christmas Decorations Cup Craft

This very easy Christmas decorations craft idea is great. Use paper cups to make these cute table toppers.
Materials:

  • water cooler paper cone cups
  • paints, glitter, beads, felt, yarn, markers, and any other decorating materials
  • glue

Directions:

Paint them, cover them in glitter, add beads for a Christmas tree, make a Santa, Let your imagination go.
Also, punch 2 holes, tie some elastic, and make cute little Christmas hats.


Source: Apartment Therapy
You have read this article christmas / christmas tree / cups with the title cups. You can bookmark this page URL http://tangrila.blogspot.com/2012/06/easy-christmas-decorations-cup-craft.html. Thanks!

Cup Rocket Launcher Toy Craft


Here's a really fun rocket launcher toy craft made from 2 plastic cups.

Materials:

  • 2 plastic cups
  • 2 strong rubber bands
  • thick tape like masking tape or carpet tape
  • thick paper or construction paper
  • crayons
  • scissors

Directions:
  1. Cut 4 short slits in a cross shape on the rim of one cup.
  2. Cut 2 rubber bands, tie a knot in the ends and slip the ends into the slits to form an "X" inside the cup.
  3. Put some tape over the slits and ends to secure.
  4. Draw and decorate a rocket from thick paper and cut out.
  5. Tape your rocket to the front of the cup.
  6. Push the rocket cup down on top of another cup. Let go and the rocket shoots up.
Source: Preschool Alphabet
You have read this article cups / space / toy with the title cups. You can bookmark this page URL http://tangrila.blogspot.com/2012/05/cup-rocket-launcher-toy-craft.html. Thanks!

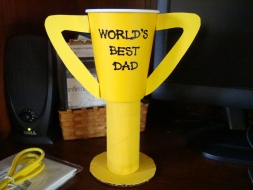
Father's Day Trophy Craft

Dad will be proud to display this Father's Day Trophy craft on his desk. He can also use it s a candy dish to fill with his favorite snacks.

Materials:

  • handles template (from site below)
  • paper cup
  • toilet paper roll
  • paint and brushes
  • markers
  • old cereal box
  • cardboard
  • scissors
  • glue
  • decorations

Directions:

  1. print out the handles and bottom template and cut out.
  2. Trace handles and bottom template on an old cereal box and cut out. It might also be better to trace the bottom from thicker cardboard.
  3. Paint the paper cup, toilet paper roll, handles, and bottom the color you want your trophy. The example pictured here is yellow. Gold or silver would look good. If you plan to make many for a class, it would be better to buy colored paper cups to save time. You could also cut the handles from construction paper.
  4. Write a message on the front of the cup like, "#1 Dad", or "World's Best Dad".
  5. Fold down the ends of he handles and glue to the sides of the cup.
  6. Tun the cup upside down. Pipe glue along both ends of the toilet paper roll. Stick one end to the bottom of the cup and the other to the circle bottom. Dry upside down.
  7. After drying, add other decorations as desired.

 Source: Busy Bee Kids Crafts


You have read this article cups / father's day / sports / toilet paper roll with the title cups. You can bookmark this page URL http://tangrila.blogspot.com/2012/05/father-day-trophy-craft.html. Thanks!

4th of July Shaker Cup Craft

Show you patriotic spirit on Independence Day with this cool 4th of July shaker craft made from 2 paper cups.

Materials:

  • 2 paper cups
  • dry beans or rice
  • red, white, and blue crepe paper
  • acrylic patriotic color paints
  • paintbrushes
  • glue gun
  • glue stick
  • masking tape
  • scotch tape
  • small star stickers
  • scissors

Directions:
  1.  Fill one cup about halfway with dry beans or rice.
  2. Glue the open ends of the cups together with a glue gun.
  3. Reinforce the seal with masking tape.
  4. Paint your shaker all white as a base coat. Allow to dry.
  5. Paint your shaker like an American flag; put star stickers on most of one cup for the blue field, paint blue. Paint red stripes on the other side. Allow each color to dry. Remove star stickers to reveal white stars.
  6. Cut a few strips of patriotic color crepe paper and tape to each end for streamers.
  7. Shake your 4th of July shaker to show your spirit on Independence Day.


Source: First Palette
You have read this article 4th of July / cups / musical crafts / shaker with the title cups. You can bookmark this page URL http://tangrila.blogspot.com/2012/05/4th-of-july-shaker-cup-craft.html. Thanks!

Shark Paper Cup Craft

This is a great looking and fun shark craft. The original idea called for flower pots, but you could adapt it using big Styrofoam cups.
Materials:

  • 2 big Styrofoam or paper cups
  • blue paint
  • Blue and white craft foam or construction paper
  • fins and teeth templates
  • scissors
  • glue
  • google eyes

Directions:

  1. Paint the outside of 2 Styrofoam or paper cups blue. Allow to dry.
  2. Glue the 2 cups together mouth to mouth to make the shark's body.
  3. Use the templates from the site below or draw your own.
  4. Trace and cut out blue tail and dorsal fins and white shark teeth from paper or foam.
  5. Glue pieces onto the body.
  6. Glue on 2 google eyes.
Source: Free Kids Crafts


You have read this article beach / cups / fish / summer with the title cups. You can bookmark this page URL http://tangrila.blogspot.com/2012/05/shark-paper-cup-craft.html. Thanks!

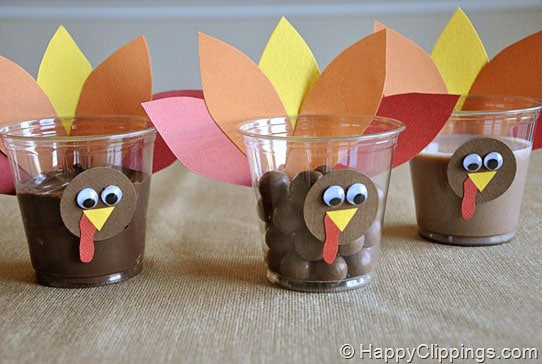
Thanksgiving Turkey Snack Cups Craft

Here are some great ooking Thanksgiving Turkey snack cups for our Thanksgiving Day party.

Materials:

  • clear plastic cups
  • yellow, red, orange, and brown construcion paper
  • scissors
  • google eyes
  • glue

Directions:

  1. Cut or punch out small circles from brown paper for the turkey heads.
  2. Cut out leaf shapes from red, orange, and yellow paper for tail feathers.
  3. Cut out yellow triangle beaks and litttle red waddles.
  4. Glue eyes, beak an waddle to the brown circles. Glue the heads to the front of the cups.
  5. Glue the tail feathers in a fan to the back of the cups.
  6. Fill with drinks or party snacks.
Source: Happy Clippings
You have read this article cups / party / Thanksgiving with the title cups. You can bookmark this page URL http://tangrila.blogspot.com/2012/04/thanksgiving-turkey-snack-cups-craft.html. Thanks!

4th of July Uncle Sam Hat Party Cups

Make these decorative 4th of July snack cups for your next Independence Day bash.

Materials:

  • Styrofoam or paper cup
  • red and blue felt
  • scissors
  • glue
  • red paint
  • paintbrushes
  • silver pipe cleaners or silver star stickers

Directions:

  1. Lay the mouth of a paper cup down on red felt and trace the opening.
  2. Now trace another circle about 3/4 of an inch bigger around the first one.
  3. Cut out the big circle.
  4. Make a slit and cut out the inside circle. This ring will become the brim of the hat.
  5. Paint red stripes all the way around the cup.
  6. Cut a 1.5 inch wide rectangle from blue felt long enough to wrap around the top part of the cup.
  7. Glue on the blue felt.
  8. Turn cup upside down. Put glue all around the base of the opening and lay the red felt brim down on top. Allow to dry.
  9. Bend silver pipe cleaners into stars and glue to the blue field. Allow everything to dry.
  10. Fill with snacks and give them as party favors.


source: Kaboose
You have read this article 4th of July / cups / food / party with the title cups. You can bookmark this page URL http://tangrila.blogspot.com/2012/04/4th-of-july-uncle-sam-hat-party-cups.html. Thanks!

Father's Day Trophy Candy Dish Craft 2

Here's a great Father's Day trophy craft that doubles as a candy dish.

Materials:
  • 1 paper cup
  • 1 paper bowl
  • card stock
  • gold or silver paint
  • construction paper
  • scissors
  • glue

Directions:

  1. Draw 2 half heart shapes from card stock for the trophy handles.
  2. Paint the cup, bowl, and handles gold or silver. Allow to dry.
  3. Place the cup upside down. Glue the handles on the sides and glue the bowl on top.
  4. Write "#1 Dad" on a piece of construction paper, cut out and glue to the front of the trophy.

You have read this article cups / father's day with the title cups. You can bookmark this page URL http://tangrila.blogspot.com/2012/03/father-day-trophy-candy-dish-craft-2.html. Thanks!

Father's Day Trophy Cup Craft 1


Make a Father's Day Trophy Craft from paper cups for the #1 Dad.

Materials:

  • 2 paper cups
  • masking tape
  • construction paper
  • gold paint
  • scissors
  • gold pipe cleaners(optional)
  • small box(optional)

Directions:

  1. Tape 2 paper cups together at the bottoms with masking tape.
  2. Paint completely with gold paint.
  3. Cut our 2 "D" shapes or 2 half heart shapes from construction paper for the handles. Paint gold the same as the trophy.
  4. Glue on the handles.
  5. Decorate you trophy an with the message, "#1 Dad"

Variations:
  1. Instead of making paper handles, poke 2 holes on either side of the top cup and insert gold pipe cleaners to make the handles. Tape in place on the inside.
  2. Paint a small box gold for a base and glue the trophy on top. Add a message to the base.


You have read this article cups / father's day with the title cups. You can bookmark this page URL http://tangrila.blogspot.com/2012/03/father-day-trophy-cup-craft-1.html. Thanks!

Paper Plate Roller Car Toy Craft

This is an easy and fun toy craft my daughter brought home from her Japanese elementary school. It's a roller car made from paper plates and paper cups. This one has fruit and flower themes in the middle and Halloween characters on the ends, but any theme will do.

Materials:
  • 2 paper plates
  • 2 paper cups
  • tape
  • glue
  • paper
  • markers
  • ribbon
  • other decorating materials

Directions:

  1. Tape 2 paper cups together at the bottoms.
  2. Decorate your cups directly or draw shapes and cut and paste on.
  3. Decorate your paper plates.
  4. Glue 1 paper plate on either end of the cups. Allow to dry.
  5. If desired, tape 3 curled strips from thick paper to the middle. They will make a flapping sound on the floor when you roll your car.
  6. Have races with your friends y pushing with your hands or blowing.


You have read this article cups / fruit / halloween / Japanese crafts / paper plate / toy with the title cups. You can bookmark this page URL http://tangrila.blogspot.com/2012/03/paper-plate-roller-car-toy-craft.html. Thanks!

Easter Chick Egg Carton Cup Craft

These are adorable little Easter chick treat holders from an egg carton that are cute and fun to make. Give them as party favors at your next Easter party.

Materials:
  • egg carton
  • yellow paint
  • thick tape like carpet tape or duct tape
  • scotch tape
  • black marker
  • orange and yellow construction paper
  • scissors
  • glue

Directions:

  1. Carefully cut the cups from an egg carton.
  2. Put 1 cup on top of another and connect in the back with a strip of carpet tape or duct tape
  3. Paint everything yellow. Allow to dry.
  4. Cut little triangle beak pieces and feet from orange construction paper nd triangle wings from yellow.
  5. Tape 1 beak on the inside of the top and bottom cups nd 2 wings on the bottom cup
  6. Glue on the feet.
  7. draw eyes with a marker or use google eyes.
  8. Fill yur chicks with Easter candy.

Variation:
You could easily paint white, add ears and a couple of pom poms to make Easter Bunny cups.


You have read this article chicken / cups / Easter with the title cups. You can bookmark this page URL http://tangrila.blogspot.com/2012/02/easter-chick-egg-carton-cup-craft.html. Thanks!