Showing posts with label Easter. Show all posts

Christian Cross Silhouette Craft


This is a beautiful Christian Cross silhouette craft I found on line. This great idea came from  a great site, Housing a Forest. Follow the link below for a full step by step tutorial on this simple craft.  fabulous effect.

Housing a Forest
You have read this article Christian crafts / Easter with the title Easter. You can bookmark this page URL http://tangrila.blogspot.com/2012/08/christian-cross-silhouette-craft.html. Thanks!

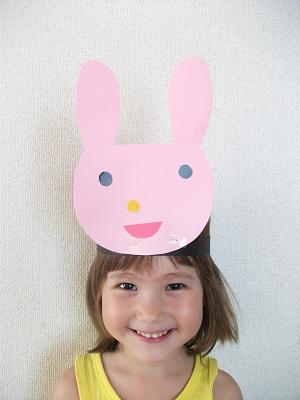
Easter Bunny Headband Craft


Here's my younger daughter with a cute Easter Bunny headband craft. Wear it and hop around.

Materials:

  • various colored construction paper
  • ruler
  • scissors
  • black, yellow, and pink plastic tape like electrical tape(optional)
  • stapler
  • rubber band

Directions:

headband:
  1. Cut a strip of black construction paper 21 inches long and about 2 inches wide.
  2. Fold the strip in half lengthwise and glue together for durability. Now you have a 1 inch wide strip.
  3. Fold both ends in about 2 inches. insert a rubber band between both ends and staple the folds closed. Now you have a loop connected by a rubber band.
  4. Staple the bunny head to the middle of the headband.

Easter Bunny Face:

  1. Trace and cut out the bunny head from pink paper.
  2. For the face, you have 2 choices; One, simply cut the pieces from colored paper and glue on. But, my daughter got this at a festival as an activity craft. Beforehand, the teachers had laid down strips of colored electrical tape on a cutting surface and pre-cut the face pieces, eyes, nose, and mouth with a craft knife and put on a slick surface like a whiteboard or plastic folder. At the event, the kids simply stuck on face pieces on the pre-made Easter Bunny headband.


You have read this article animals / Easter / mask / spring with the title Easter. You can bookmark this page URL http://tangrila.blogspot.com/2012/08/easter-bunny-headband-craft.html. Thanks!

Easter Bottle Cap Crosses Christian Craft


This is a great Christian Cross craft idea using bottle caps and family photos. It's good for a kids bible study craft or an Easter craft.

Materials:

  • bottle caps, 10 per cross
  • ribbon
  • scissors
  • glue
  • jumbo craft sticks
  • family photos
  • Paint(optional)

Directions:

  1. If desired, paint craft sicks with paint and allow to dry, beforehand.
  2. Trace around family pictures with a bottle cap. Cut out pictures inside the line, one photo for each bottle cap.
  3. Glue craft sticks together in a cross shape.
  4. Glue pictures into bottle caps an glue bottle caps onto the cross. Allow to dry.
  5. Tie ribbon into a loop and lue o tape to the back of the cross.

Source: FavCrafts
You have read this article Christian crafts / Easter / recycled crafts with the title Easter. You can bookmark this page URL http://tangrila.blogspot.com/2012/05/easter-bottle-cap-crosses-christian.html. Thanks!

Easter Mother's Day Handprint Flowers Craft

Thanks so much to Cari for sending in this great hand print flowers craft with candies. This would be equally great for Easter or Mother's Day.

Materials:
  • glass or vase
  • plastic grass
  • various colored construction paper
  • scissors
  • paint, brushes
  • glue
  • green pipe cleaners
  • chocolate oil eggs or other candy of choice

Directions:

  1. Brush  color paint of your choice on little hands and press onto construction paper.
  2. Repeat with different color paint and paper. Allow to dry.
  3. Cut out hand prints. You need 2 hand prints for each flower. You can do both hands or print one hand, cut out and trace a matching hand on a different paper and cut out.
  4. Spread glue and sandwich a pipe cleaner between a matching pair and allow to dry.
  5. Fill a glass or vase with plastic grass and your favorite candy. Insert the hand print flowers and present them to mom.
Step by step tutorial from: Two Sasters

You have read this article Easter / flowers / hand print / mother's day / your ideas with the title Easter. You can bookmark this page URL http://tangrila.blogspot.com/2012/04/easter-mother-day-handprint-flowers.html. Thanks!

Easter Bunny Paper Plate Craft

Here's a really simple idea to make an Easter Bunny candy holder from a paper plate.

Materials:

  • 1 paper plate
  • white paper or card stock
  • pink crayon
  • scissors
  • glue

Directions:
  1.  Fold a paper plate tightly in half.
  2. Cut out simple ears, decortate and glue to the back of your paper plate.
  3. Draw a face on your Easter Bunny.
  4. Open the lid and fill with jellybeans or your favorite Easter candy.


Source: Crafty Kid
You have read this article animals / Easter / paper plate / party with the title Easter. You can bookmark this page URL http://tangrila.blogspot.com/2012/04/easter-bunny-paper-plate-craft.html. Thanks!

Paper Plate Spring Lamb Craft

This is a really cute and simple lamb craft from a paper plate. You can print out the face template from the link below. I like any craft that reminds me of Shaun the Sheep.

Materials:
  •  small paper plate
  • lamb template
  • black and pink construction paper
  • otton balls
  • google eyes
  • glue

Directions:

  1. Print and cut out the color lamb template. Use as is, or trace and cut out on black and pink construction paper.
  2. Glue the ears to the face and fold down. Glue the nose on.
  3. Glue cottom balls all over the paper plate.
  4. Glue the face on top.
  5. Add google eyes.

 
Source: Krafty Kid
You have read this article animals / Easter / paper plate / sheep / spring with the title Easter. You can bookmark this page URL http://tangrila.blogspot.com/2012/04/paper-plate-spring-lamb-craft.html. Thanks!

Paper Plate Chick in Egg Craft


 Here's an adorable Chick in Egg Craft made from a paper plate. This is a great craft for Easter or Spring.
Materials:
  • 2 large paper plates
  • 1 small paper plate
  • yellow paint
  • paintbrushes
  • scissors
  • 2 google eyes
  • orange paper or foam
  • glue
  • yellow craft feather
Directions:
  1. Cut the the small paper plate in half making a scalopped edge to make the wings. Paint yellow and allow to dry.
  2. Paint 1 large paper plate yellow and allow to dry.
  3. Cut th other large paper plate to look like a broken eggshell.
  4. Glue the large yellow paper plate behind the white eggshell one.
  5. Glue or staple on the wings.
  6. Glue on google eyes, an orange triangle beak, and top it off with a yellow feather.
Alternative:
Use brass fastners and a hole punch instead of glue to attach the wings, then they can move.


Source: Free Kids Crafts


You have read this article animals / birds / Easter / paper plate / spring with the title Easter. You can bookmark this page URL http://tangrila.blogspot.com/2012/04/paper-plate-chick-in-egg-craft.html. Thanks!

Easter Candy Carrot Craft(from Circus Peanuts)

Thanks so much to Lisa Davala from Spangler Candy in Bryon, Ohio for sending this in. They're the makers of Circus Peants marshmallow candy and Dum Dum lollipops. You can use Circus Peanuts to make cute Easter carrots to eat alone or decorate on cupcakes, a great and tasty idea.

Materials:

Directions:

  1. Unwrap Circus Peanuts and lay them out.
  2. Squeeze one end of the Circus Peanut; do so until your marshmallow candy comes to a point.
  3. Take toothpick and drag across the top of the circus peanut in a horizontal manner. You can alternate between short lines and longer lines.
  4. When you finish making creases in your marshmallows, mimicking the lines of a real carrot, you are ready to insert the licorice 'carrot tops'.
  5. There are two types of licorice, pull and peel the will automatically be the size you need, however the more readily available type is standard. For this kind, you can make a slit following one of the lines. Cut along each rivet in order to make skinny slivers of licorice.
  6. Take each strip of licorice and cut in half.
  7. Next, use a toothpick to poke a hole in the top of the carrot about half an inch deep (opposite the pointed end).
  8. You may need to make two holes consecutively in order to fit the licorice. Take two-three pieces of licorice and insert the ends into the hole.
  9.  Make sure to push them in as far as you can. You can leave the licorice carrot tops longer, or trim them to your liking.
  10.  To keep the 'carrots' fresh, you can put them in an airtight container, or plastic zipper bag
*We recommend placing these in Easter baskets, as snacks on the table, and best yet, on top of carrot cake cupcakes!
You have read this article Easter / food / your ideas with the title Easter. You can bookmark this page URL http://tangrila.blogspot.com/2012/03/easter-candy-carrot-craftfrom-circus.html. Thanks!