Noah's Ark Bible Craft 3

This Noah's Ark craft has little windows to open and reveal an animal inside. You can print out the template and put it together. I think it would be fun to substitute your own animal pictures in the windows.

Materials:

  • Noah's Ark template(2 pages)
  • card stock
  • crayons
  • scissors
  • exacto knife
  • glue

Directions:

  1. Print out the templates It's best if you can print them on card stock or white construction paper.
  2. Cut out both templates. Use a sharp knife to cut open the window flaps.
  3. Color the front part brown for the ship.
  4. Color the characters on the inside page or substitute your own animals.
  5. Glue both pieces together.
Source: Fun with Little Mouse


You have read this article Christian crafts with the title March 2012. You can bookmark this page URL http://tangrila.blogspot.com/2012/03/noah-ark-bible-craft-3.html. Thanks!

Noah's Ark Bible Craft 1

This is a cute touch and feel Noah's Ark craft that uses textured materials for a sensory craft.

Materials:

  • sheet of blue construction paper
  • sandpaper
  • scissors
  • Q-tips
  • blue paint
  • glue
  • cotton balls
  • animal crackers

Directions:

  1. Draw a simple Noah's ark on white paper and cut out.
  2. Trace the template onto sandpaper and cut out.
  3. Glue the ark to the blue paper.
  4. Cut Q-tips in half and dip the ends in blue paint. Allow to dry. Glue onto the blue paper for rain.
  5. Glue cotton balls on for clouds.
  6. Glue animal crackers onto the ark. Allow everything to dry.
Source: The best kids book site

You have read this article Christian crafts with the title March 2012. You can bookmark this page URL http://tangrila.blogspot.com/2012/03/noah-ark-bible-craft-1.html. Thanks!

Easter Candy Carrot Craft(from Circus Peanuts)

Thanks so much to Lisa Davala from Spangler Candy in Bryon, Ohio for sending this in. They're the makers of Circus Peants marshmallow candy and Dum Dum lollipops. You can use Circus Peanuts to make cute Easter carrots to eat alone or decorate on cupcakes, a great and tasty idea.

Materials:

Directions:

  1. Unwrap Circus Peanuts and lay them out.
  2. Squeeze one end of the Circus Peanut; do so until your marshmallow candy comes to a point.
  3. Take toothpick and drag across the top of the circus peanut in a horizontal manner. You can alternate between short lines and longer lines.
  4. When you finish making creases in your marshmallows, mimicking the lines of a real carrot, you are ready to insert the licorice 'carrot tops'.
  5. There are two types of licorice, pull and peel the will automatically be the size you need, however the more readily available type is standard. For this kind, you can make a slit following one of the lines. Cut along each rivet in order to make skinny slivers of licorice.
  6. Take each strip of licorice and cut in half.
  7. Next, use a toothpick to poke a hole in the top of the carrot about half an inch deep (opposite the pointed end).
  8. You may need to make two holes consecutively in order to fit the licorice. Take two-three pieces of licorice and insert the ends into the hole.
  9.  Make sure to push them in as far as you can. You can leave the licorice carrot tops longer, or trim them to your liking.
  10.  To keep the 'carrots' fresh, you can put them in an airtight container, or plastic zipper bag
*We recommend placing these in Easter baskets, as snacks on the table, and best yet, on top of carrot cake cupcakes!
You have read this article Easter / food / your ideas with the title March 2012. You can bookmark this page URL http://tangrila.blogspot.com/2012/03/easter-candy-carrot-craftfrom-circus.html. Thanks!

Easy Paper PlateTurtle Craft

This paper plate tutle is simple to make. Use it as a fingerpaintig project for your yongest kids. The colors used here were green and purple. You can change the color scheme, but keep it to 2 colors. If you mix too many, it looks muddy.

Materials:

  • paper plate
  • scissors
  • paints
  • toilet roll
  • shallow dishes
  • google eye
  • glue

Directions:

  1. Cut the rim off a paper plate and cut the center in half.
  2. Use one half to cut a small simple head, tail, and legs.
  3. Put green and purple paint in dishes. Paint the half circle green with child's fingers and paint head, tail, and legs purple. Dip the end of a toilet paper roll in purple paint and stamp onto the turtle's shell. Allow everything to dry.
  4. Glue pieces onto the back of the turtle. Glue a google eye on the head.
Source: 4 Crazy Kings
You have read this article animals / fingerpainting / paper plate / toilet paper roll with the title March 2012. You can bookmark this page URL http://tangrila.blogspot.com/2012/03/easy-paper-plateturtle-craft.html. Thanks!

4th of July Patriotic Flag Mobile Craft

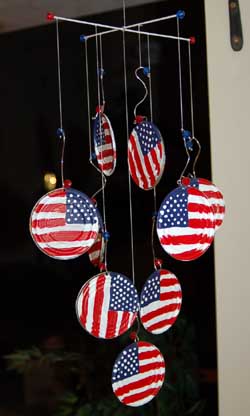
This 4th of July patriotic flag mobile craft is a great way to show your spirit. The original version of this craft pictured here was made from soup can lids and wire, but you can easily adapt this idea to a easier and safer paper craft.

Materials:

  • soup can
  • card stock
  • red and blue markers
  • white out or white paint pen
  • dowel rods
  • red and blue beads
  • string
  • hole punch
  • super glue

Directions:
  1. Use a soup can to trace 9 circles onto white card stock and cut out.
  2. Color the top left quarter of the circle blue. Add red stripes. The first stripe on a flag is red. Add white dots to the blue field for stars with a paint pen or white out. Repeat for all circles.
  3. Punch a hole in the top of each flag circle.
  4. Cut 2 dowel rods about a foot long and tie together in a cross shape.
  5. Add a blue or red bead to the ends with super glue.
  6. Cut 4 pieces of string the same length. Cut 4 more strings longer than the first group. Finally cut 1 string the longest.
  7. Tie all the strings to the flag circles.
  8. Tie the other ends to the dowel cross. Tie the 4 shortest ones on the ends of the dowels, the longer 4 inside those, and the longest one in the middle.
  9. Tie a string o top of the flag mobile and hang up.
  10. Adjust the strings on the dowel to get a good balance.
Variations:
Actually, since we're using paper, the flags don't need to be circles. You could make rectangles.

You could paste both sides o the card stock with 4th of July wrapping paper and cut out the shapes from that.

You have read this article 4th of July / flags / mobile with the title March 2012. You can bookmark this page URL http://tangrila.blogspot.com/2012/03/4th-of-july-patriotic-flag-mobile-craft.html. Thanks!

4th of July Paper Lantern Craft


These cute 4th of July paper lanterns are simple to make and look great. String them up as decorations for your next Independence Day party.

 
Materials:

  • red, white, and blue paper
  • scissors
  • glue
  • paper or sticker stars
  • 4th of july motif tape
  • star punch if you have it

Directions:
  1.  Cut a large rectangle from colored paper.
  2. Fold in half lengthwise.
  3. Make cuts with scissors about every 1/2 inch or so.
  4. Unfold the paper, and roll to make a cylindar with slits. Glue in place.
  5. Push down gently to make the sides stick out.
  6. Cut a thin rectangle and glue to the top to make a loop to hang.
  7. Decorte the top and bottom with patriotic tape. Add paper stars or use a star punch.
  8. String them up along a length o ribbon or a string of lights for  Independenc Day party decorations.

You have read this article 4th of July / lantern with the title March 2012. You can bookmark this page URL http://tangrila.blogspot.com/2012/03/4th-of-july-paper-lantern-craft.html. Thanks!

4th of July Star Mobile Craft


This 4th of July Star mobile craft is recycled from a cereal box. You'll have loads of fun doing it.

Materials:
  •  cereal box
  • red and blue paint, brushes
  • glitter(or red and blue paint with glitter)
  • newspaper
  • pencil
  • star templates
  • scissors
  • exacto knife
  • hole punch
  • red, white, and blue ribbon
  • glue
  • clothespins

Directions:

  1. Completely cut apart a cereal box. Cut off and discard the top and bottom flaps. The front and back panels will be used to make the stars. The side panels the top ring.
  2. Lay down newspaper. Paint the blank side of the front and back panels blue and sprinkle on glitter. Paint the blank side of the side panels red and sprinkle with glitter. Or use glitter paint. Allow to dry.
  3. Trace big and small stars on the printed side of the blue panels and along the red panels.
  4. Cut out the blue stars with scissors. Discard the excess.
  5. Cut out the red stars with an exacto knife.
  6. Glue the 2 red side panels together to make a ring. Secure with clothespins.
  7. Cut different lengths of ribbon. Sandwich the ribbon between 2 stars of the same size with glue.
  8. Punch holes around the bottom of the irng and tie the stars.
  9. Punch holes around the top and tie ribbon to hang up the 4th of July mobile.


Source: 4 Crazy Kings
You have read this article 4th of July / Earth Day / mobile with the title March 2012. You can bookmark this page URL http://tangrila.blogspot.com/2012/03/4th-of-july-star-mobile-craft.html. Thanks!

4th of July Star Prints Craft

This patriotic 4th of July star prints craft idea is so easy and only takes minutes.


Materials:

  • white paper
  • red and blue paint
  • star shaped cookie cutters
  • shallow dishes


Directions:

  1. Put red and blue paint into shallow dishes.
  2. Dip star cookie cutters into the paint and press onto white paper. Allow to dry. That's it!


You have read this article 4th of July with the title March 2012. You can bookmark this page URL http://tangrila.blogspot.com/2012/03/4th-of-july-star-prints-craft.html. Thanks!

4th of July Coffee Filter Fireworks Flower Craft

These 4th of July coffee filter fireworks can be made into a bouquet and a centerpiece for your next Independence Day party.

 
Materials:

 
  • basket coffee filters(2 for each flower)
  • red, white, blue, gold, and silver pipe cleaners
  • red and blue water color paint, brushes
  • scissors
  • paper plate
  • paper towels

 
Directions:

  1. Flatten out a coffee filter on a paper plate.
  2. Brush on red and blue water colors, leave some white places between.
  3. Put on a paper towel and allow to dry. repeat with a second coffee filter.
  4. Cut strips in the coffee filters, leaving the center intact.
  5. Take a pipe cleaner and cut off about 1.5 inches. Save the small piece for later.
  6. Poke the long pipe cleaner through the center of both coffee filters. About 2 inches should poke through.
  7. Turn upside down and twist the small pipe cleaner around the bottom of the filters to secure them in place.
  8. Spread the strips out as you like.
 Source: Crafts by Amanda
You have read this article 4th of July / flowers with the title March 2012. You can bookmark this page URL http://tangrila.blogspot.com/2012/03/4th-of-july-coffee-filter-fireworks.html. Thanks!

4th of July Fireworks T-shirt Craft

This 4th of July fireworks T-shirt craft idea is absolutely fabulous. Use pipe cleaners as a stamp to create this wonderful design. I found this on a great website by an American woman living in Japan like me(I'm a guy). The site has a great video tutorial in English and Japanese. Check it out.

Materials:

  • T-shirt(a bold, darker color is better)
  • various color glitter glue
  • pipe cleaners(color is not important)

Directions:
  1. Take 6 pipe cleaners, fold them on half and twist the fold to make your handle.
  2. Splay out the pipe cleaners in all directions.
  3. Lay your T-shirt own on a flat surface.
  4. Pipe glitter glue over the pipe cleaners. You can use different colors. Turn down and firmly stamp onto the T-shirt. Press down the pipe cleaners with your fingers for a good impression.
  5. Pull off your stamp, turn slightly and stamp again in the same place for a neat effect.
  6. Later, you can cut the pipe cleaners shorter to make smaller fireworks. Allow to dry.
  7. Probably a good idea to turn the T-shirt inside out when you wash it.
Source: Jackie Allen
You have read this article 4th of July / clothes with the title March 2012. You can bookmark this page URL http://tangrila.blogspot.com/2012/03/4th-of-july-fireworks-t-shirt-craft.html. Thanks!

4th of July Pipe Cleaner Sparkler Craft


This 4th of July pipe cleaner sparkler craft is so easy and fun. They're much safer than real sparklers, good for any age. Give them as favors at your next Independence Day party.

Materials:

  • 2 red pipe cleaners
  • 2 blue pipe cleaners
  • 4 white sparkly pipe cleaners

Directions:
  1.  Put your red and blue pipe cleaners together and your white ones together.
  2. Lay the 4 white pipe cleaners in a bunch, flat o the table.
  3. Wrap the red and blue pipe cleaners around the center of the white ones.
  4. Bend up the white pipe cleaners a little and twist the red and blue together.
  5. Twist the white pipe cleaners once and splay them out. Leave them straight for a shooting look, or bend them zigzag in all directions.

You have read this article 4th of July / toy with the title March 2012. You can bookmark this page URL http://tangrila.blogspot.com/2012/03/4th-of-july-pipe-cleaner-sparkler-craft.html. Thanks!

4th of July Fireworks Picture Craft 2

This 4th of July fireworks picture craft is also very easy and fun to make with cupcake papers. It'll look great hanging on the wall or refrigerator.

Materials:

  • sheet of black construction paper
  • cupcake papers(baking cups)
  • glue
  • glitter(or glitter glue)
  • markers

Directions:

  1. Flatten out some cupcake papers and color colorfully with markers.
  2. Glue the cupcake papers to the black paper.
  3. Apply glue on the cupcake paper, sprinkle on glitter and smear around with your fingers. Or do the same thing with glitter glue. Allow to dry. That's it!
 Source: Wisdom's Path
You have read this article 4th of July with the title March 2012. You can bookmark this page URL http://tangrila.blogspot.com/2012/03/4th-of-july-fireworks-picture-craft-2.html. Thanks!

4th of July Windsock Craft 2

This is another 4th of July Windsock craft that is easy and fun to make.

Materials:
  •  
  • sheet of blue card stock or construction paper
  • white paint, brushes
  • red and white crepe paper streamers
  • glue
  • hole punch(star punch if you have it.)
  • stapler
  • string to hang.

Directions:

  1. Paint star designs on a sheet of blue paper with white paint. Allow to dry.
  2. Roll up the paper into a cylinder and staple together.
  3. Cut length of red and white crepe paper and glue to the bottom.
  4. Punch 2 holes on the top and tie a string to hang.
  5. Watch it blow in the wind.
You have read this article 4th of July with the title March 2012. You can bookmark this page URL http://tangrila.blogspot.com/2012/03/4th-of-july-windsock-craft-2.html. Thanks!

4th of July Glitter Fireworks Picture Craft 1

This 4th of July glitter fireworks craft is very simple and fun to make.

Materials:

  • sheet of black construction paper
  • white glue
  • glitter
  • shallow dish to catch the glitter

Directions:

  1. Use white glue and draw star like fireworks shapes.
  2. Sprinkle glitter over the glue and then pour off the excess into a dish. Do one color glitter at a time as no to mix up the excess. Allow to dry.
  3. Hang up your Independence Day art.

Variations:
  • Instead you could just use glitter glue. It's easier and produces less wastage, but not quite as fun.
  • Twist a bunch of pipe cleaners together and fold down the ends into a star shape. Pipe glitter glue on the pipe cleaners and press it onto the paper like a stamp. Turn and stamp several times in the same place for a neat effect. This idea came from the 4th of July Fireworks T-shirt craft. Check it out. Follow the link for a cool video tutorial.
 Source: I Heart Crafty Things
You have read this article 4th of July with the title March 2012. You can bookmark this page URL http://tangrila.blogspot.com/2012/03/4th-of-july-glitter-fireworks-picture.html. Thanks!

4th of July Toilet Paper Roll Rocket Craft

4th of July Toilet paper roll rockets are easy and fun to make. Remember the key colors are red, white, and blue. Don't forget the stars.

Materials:

  • toilet paper roll
  • red, white, and blue paints
  • brushes
  • red, white, and blue construction paper
  • scissors
  • glue
  • tape
  • stickers or other decorating materials

Directions:

  1. Depending on the paint, it might look better to cover the toilet roll in white paper and fold down the excess into the roll and then paint over that.
  2. Paint or otherwise decorate your toilet paper roll.
  3. Cut a small half circle or a 3/4 circle out from colored paper. Twist the paper into a cone and tape in place. A half circle makes a taller cone, a 3/4 circle makes a wider cone.
  4. Glue or tape the cone to the top.

Variations:
  • You can glue or tape strips of red and yellow tissue paper to the bottom for fire.
  • Put a string through the cone and hang up.
  • Tape a straw or dowel inside to make a handle.
  • Tie a small bag of candy, stuff it inside the rocket, and give them as party favors at your Independence Day Party.
 
You have read this article 4th of July / party / toilet paper roll / toy with the title March 2012. You can bookmark this page URL http://tangrila.blogspot.com/2012/03/4th-of-july-toilet-paper-roll-rocket.html. Thanks!

4th of July Handprint Footprint Flag Craft

This large 4th of July hand print and footprint flag craft was for the whole class. Mount it on the wall.

Materials:

  • large sheet of poster paper
  • red and blue paint
  • brushes
  • dishes.

Directions:

  1. Lay the big paper down on the floor. Use a ruler to mark lines with pencil for the blue field and stripes.
  2. Have students dip or brush hands with blue paint and press onto the hands the top left corner of the paper for stars. Alternatively, you could paint a blue field, allow to dry and then make white hand prints.
  3. Dip or brush students feet with red paint and make foot prints in a line for the stripes. Remember, the top and bottom stripes of an American flag are red.
  4. Allow everything to dry and display.


Source: Random Handprints
You have read this article 4th of July / footprints / hand print with the title March 2012. You can bookmark this page URL http://tangrila.blogspot.com/2012/03/4th-of-july-handprint-footprint-flag.html. Thanks!

Easy 4th of July Handprint Flag Craft

This is a very simple 4th of July hand print flag craft. Great for even the youngest students.


Materials:

  • blue construction paper
  • Popsicle stick(craft stick) or tongue depressor
  • red, white and blue paint
  • paint brushes
  • glue
  • red and white ribbon
  • foil star stickers

Directions:
  1. Cut a rectangle from blue construction paper big enough for the child's hand.
  2. Carefully paint the child's right palm blue and the fingers alternating with red and white. Remember, the first stripe on an American flag is red.
  3. Press hand onto the blue paper. Allow to dry.
  4. Glue the blue paper o a Popsicle stick or tongue depressor for a handle.
  5. Glue or tape red and white ribbon to the top.
  6. Wave your hand print flag.
You have read this article 4th of July with the title March 2012. You can bookmark this page URL http://tangrila.blogspot.com/2012/03/easy-4th-of-july-handprint-flag-craft.html. Thanks!

4th of July Pom Pom Flag Craft

This adorable and flexible 4th of July pom pom flag can be used in many ways.

Materials:

  • glue gun with glue sticks
  • metallic red, white, and blue pom poms(1/4 inch size)
  • small clear rhinestone crystals
  • 1.5x2 inch piece of blue felt

Directions:
  1. Put a dab of glue on each blue pom pom and line them up on the blue felt piece.
  2. Apply little dabs of glue to the top of the blue pom poms and put a rhinestone crystal on top to make the stars. About 12 is good or you could go all out and do 50.
  3. Use the glue gun to make a 2 lines of 5 red pom poms and 1 line of 5 white pom poms. These will be the lines next to the blue field. Hold each line in place until the glue hardens.
  4. Glue together 2 more lines of red and white with 10 pom poms each. Now you have 4 long lines, 2 red, 2 white.
  5. Start with the short red line and glue to the right of the blue field. Apply glue along the red line and attach the white line. Continue this process down the flag. A proper American Flag has a red stripe at the top and bottom.

You can do several things with this flag;
  • You could glue the whole thing to some cardboard for a display.
  • You could attach a dowel and stick in a planter.
  • Attach magnets and put on the refrigerator.
  • Wear it.
  • You could also scale it up and do the same craft with big pom poms.
Source: Glue Gun Crafts
You have read this article 4th of July with the title March 2012. You can bookmark this page URL http://tangrila.blogspot.com/2012/03/4th-of-july-pom-pom-flag-craft.html. Thanks!

4th of July Flag and Shaker Craft

This simple 4th of July Flag and shaker will be fun during your next Independence Day parade.

4th of July Flag

Materials:

  • white construction paper
  • red and blue paints
  • sponges and rollers
  • star stamps
  • tape
  • drinking straws

Directions:

  1. Sponge on a blue field in the top left corner of a sheet of white construction paper.
  2. Press star stamps into the field.
  3. Roll red paint in wavy lines to make the stripes. Allow to dry.
  4. Tape 2 drinking straws to the back near the edge with the blue field. Tape another straw sticking down for a handle.
  5. Wave your flag.

4th of July Shaker

Materials:

  • red and blue paint
  • rollers
  • 2 paper plates
  • raw beans or seeds
  • white crepe paper roll
  • glue
  • stapler

Directions:
  1. Decorate the backs of 2 paper plates with star and stripes.
  2. Cut several long strips of white crepe paper and roll red paint for stripes.
  3. Glue the crepe paper hanging down to the inside of 1 paper plate.
  4. Put some raw beans on the paper plate
  5. Sandwich the other paper  plate on top and staple all around to seal.
  6. Shake your 4th of July shaker.
Source: Learning Montessori
You have read this article 4th of July / birds / musical crafts / shaker with the title March 2012. You can bookmark this page URL http://tangrila.blogspot.com/2012/03/4th-of-july-flag-and-shaker-craft.html. Thanks!

4th of July Tissue Paper Stars Craft

These 4th of July Tissue paper stars will look great hanging on the window for Independence Day. They're made from tissue paper and contact paper.
Materials:

  • black construction paper
  • contact paper
  • blue and red tissue paper
  • scissors
  • red, white, and blue card stock or construction paper
  • glitter glue and other decorating materials
  • scissors
  • craft knife
  • hole punch
  • string


Directions:

  1. Trace and cut out a large star from black construction paper. Use a craft knife to carefully cut out the center. It might be easier to do this before cutting out the star.
  2. Cut a large sheet of contact paper and peel off the front.
  3. Lay the star on the sticky side of the paper.
  4. Cut red and blue tissue paper into 1 inch squares. Stick the squares all over the inside of the star. Try not to leave any gaps. If they stick outside the star, it's OK. You'll trim them off later.
  5. Peel off another piece of contact paper and sandwich it on top o the first piece. Smooth out and cut out the star.
  6. Cut out 1 square from red, white, and blue construction paper.
  7. Trace big block letters, "U", "S", and "A", 1 for each piece of paper.
  8. Decorate inside the letters with glitter glue or star stickers.
  9. Punch a hole at the top and bottom of the papers and tie them together with string so they read, "USA", vertically.
  10. Punch a hole in the top and bottom of the contact paper star. Tie the letters to the bottom and tie a string at the top to hang up.


Source: The Johnson Journey
You have read this article 4th of July / sun catcher with the title March 2012. You can bookmark this page URL http://tangrila.blogspot.com/2012/03/4th-of-july-tissue-paper-stars-craft.html. Thanks!

4th of July Windsock Craft 1

 This 4th of July Windsock craft is simple and easy to make and will look great hanging outside your door on Independence Day.

Materials:

  • wooden embroidery hoop
  • red, white, and blue crepe paper rolls
  • card stock
  • small star shape
  • pencil
  • scissors
  • glue
  • tape
  • yarn or string

Directions:

  1. Cut about 8 long lengths each of red and white crepe paper. Cut 8 lengths of blue crepe paper about a third of the length of the others.
  2. Trace and cut out stars from card stock and glue about 3 each on the blue crepe paper strips. You could alternate 3 stars on half of the blue strips and 2 stars on the other half.
  3. Wrap the ends of the red and white crepe paper over the loop and secure with tape. Alternate the colors. Then tape the blue strips on top of that.
  4. Tie a piece of string on either side of the loop and hang on a hook outside. The neighbors will be impressed as they drive by.
 Source: The Mother Huddle
You have read this article 4th of July with the title March 2012. You can bookmark this page URL http://tangrila.blogspot.com/2012/03/4th-of-july-windsock-craft-1.html. Thanks!

Dragon Toilet Roll Craft

Here's a very cute toilet paper roll dragon kids will have loads of fun blowing fire with.
Materials:

  • toilet paper roll
  • white paper(optional)
  • green paint, brushes
  • 2 green pom poms
  • 2 small beans
  • 2 google eyes
  • red tissue paper
  • glue
  • tape
  • scissors

Directions:

  1. Paint the toilet paper roll green. If using tempura paint, it looks better is you glue white paper around the toilet roll, fold the excess down inside the ends, and paint on the paper. But you don't have to.
  2. Cut long strips of red tissue paper and tape or glue to the inside of one end of the toilet roll. You could even add a few shorter strips of yellow tissue paper inside the red ones.
  3. Glue on 2 beans for nostrils and 2 pom poms for the eyes. Glue google eyes onto the front of the pom poms. Allow everything to dry.
  4. Kids will have fun blowing through the tube to make the dragon breath fire.
 Source: TPcraft.com
You have read this article dragon / toilet paper roll with the title March 2012. You can bookmark this page URL http://tangrila.blogspot.com/2012/03/dragon-toilet-roll-craft.html. Thanks!

4th of July Toilet Roll Firecrackers Craft

These 4th of July toilet roll firecrackers are a safe way to enjoy your Independence Day.

Materials:

  • toilet paper roll
  • bubble wrap
  • black pipe cleaner
  • tape
  • scissors
  • paint and/or other decorations
  • orange or red tissue paper

Directions:

  1. First take 1 long, black pipe cleaner and tape or staple the ends into one end of the toilet roll so it stands up like a loop.
  2. Twist the the pipe cleaner loo to resemble the firecracker's fuse.
  3. Cut a 2x3 inch size of bubble wrap. Roll it up and stick it into the bottom of the toilet roll. Secure with a little tape or glue.
  4. Decorate your toilet roll with paints, stickers, or paper stars. Remember the key colors are red, white, and blue!
  5. Tear off a little piece of orange tissue paper and stick onto the end of the pipe cleaner to make a lit fuse.
  6. Kids can play by sticking their fingers inside and popping the bubble wrap to sound like a firecracker.
Source: Make and Takes
You have read this article 4th of July / toilet paper roll / toy with the title March 2012. You can bookmark this page URL http://tangrila.blogspot.com/2012/03/4th-of-july-toilet-roll-firecrackers.html. Thanks!

4th of July Handprint Fireworks Craft

This 4th of July hand print fireworks craft is a lot of fun to do and will look great hanging on the wall.

Materials:

  • white paper
  • red and blue paint
  • sheet of black construction paper
  • glitter or glitter glue
  • glue
  • scissors

Directions:

  1. Dip 1 hand in red paint and make 2 hand prints on white paper. Do the same with blue paint on the other hand. Allow hand prints to dry.
  2. Cut out hand prints.
  3. Glue on black paper to look like fireworks.
  4. Draw curly, swirly lines with white glue on paper and hand prints. Sprinkle with glitter and pour off the excess. Or use glitter glue.
 Source: No Time for Flashcards
You have read this article 4th of July / hand print with the title March 2012. You can bookmark this page URL http://tangrila.blogspot.com/2012/03/4th-of-july-handprint-fireworks-craft.html. Thanks!

4th of July Fireworks Pens Craft

These 4th of July Fireworks Pens will make great favors at your next Independence Day party.

Materials:
  •  pens
  • wired red, white, and blue starred garland
  • colorful duct tape
  • small jingle bells
  • scissors

Directions:

  • For each pen, cut about 9 lengths of garland, each about 6-8 inches long.
  • Trim the stars off of the last inch of garland.
  • Cut a 1.5 inch piece of tape and lay it down, sticky side up.
  • Lay the trimmed ends of garland in the middle of the tape, in a row. Leave 1/2 inch of tape on either side.
  • Lay the pen on the tape and roll it up.
  • Thread jingle bells onto the ends of the garland and twist the ends to secure.
  • Splay out the garland to look like fireworks.

Source: Family Fun
You have read this article 4th of July / party with the title March 2012. You can bookmark this page URL http://tangrila.blogspot.com/2012/03/4th-of-july-fireworks-pens-craft.html. Thanks!

4th of July Fireworks Wand Craft

The kids will love waving around their 4th of July fireworks wand craft at their next Independence Day Party.

Materials:
  •  wooden dowel or disposable chopsticks
  • red ,white, or blue tape like electrical tape
  • red, white, and blue star wire garland
  • scissors

Directions:
  1.  Cut several 5 or 6 inch lengths of 4th of July garland.
  2. Tape garland around one end of a dowel or chopstick
  3. Wrap the rest of the dowel in red, white, or blue tape.
  4. Wave your magical and patriotic wand.


Source: Kiboomu
You have read this article 4th of July / chopsticks / toy with the title March 2012. You can bookmark this page URL http://tangrila.blogspot.com/2012/03/4th-of-july-fireworks-wand-craft.html. Thanks!

4th of July Candy Firecrackers Craft

These 4th of July candy firecracker crafts make great favors at your next Independence Day party.

Materials:

  • roll candy like lifesavers
  • colored tape
  • foil party picks(these are like long toothpicks with a foil decoration at the top)

Directions:

  1. Most roll candies have a glossy outer wrapping and an inner paper wrapping.
  2. Carefully remove the outer wrapping from the candy roll.
  3. Wrap the roll with red and blue tape.
  4. Insert a party pick on the top.


Source: Family Fun
You have read this article 4th of July / party with the title March 2012. You can bookmark this page URL http://tangrila.blogspot.com/2012/03/4th-of-july-candy-firecrackers-craft.html. Thanks!

4th of July Toilet Roll Streamer Craft

This simple 4th of July toilet roll streamer craft looks great and is easy to make.

Materials:

  • 1 toilet paper roll
  • white paint or white paper
  • glue
  • red and blue glitter glue
  • red and blue crepe paper streamer rolls
  • tape
  • string
  • hole punch

Directions:
  1.  Paint your toilet roll completely white or cover completely in white paper.
  2. Decorate with red and blue glitter glue. Draw stars and write, "USA". Allow to dry.
  3. Cut 10 to 12 inch lengths of red and blue streamers. Cut again lengthwise so they are not too wide.
  4. Tape the ends of the streamers to the inside of the toilet paper roll. Younger children may need help.
  5. Punch 2 holes through either end of the top of the roll and tie a string or piece of yarn through to hang up.
  6. Watch your 4th of July streamer blow in the wind.

You have read this article 4th of July / toilet paper roll with the title March 2012. You can bookmark this page URL http://tangrila.blogspot.com/2012/03/4th-of-july-toilet-roll-streamer-craft.html. Thanks!

Rocket Jet Pack Bottle Craft

I absolutely love this rocket jet pack craft. It look so much fun. The only problem is the kids won't ever want to take them off.

Materials:

  • 2 large plastic drink bottles with cap(the round 1.5 liter kind are great)
  • mirror board, reflective wrapping paper, or aluminum foil
  • long strips of yellow tissue paper
  • medium strips of red tissue paper
  • short strips of orange tissue paper
  • gaffer tape(thick black tape)
  • elastic
  • scissors
  • glue with brush or sponge

Directions
  1. Cut a piece of reflective paper big enough to completely wrap up the bottle.
  2. With the cap on, brush one entire plastic bottle with glue and roll up with reflective paper. Glue down the flap.
  3. Lay down a long strip of gaffer tape, sticky side up.
  4. Start at one end and stick the strips of the long yellow tissue paper in a row. Leave about half the tape uncovered along the opposite edge to stick to the bottle cap. Continue down the tape with the medium red and finally short orange tissue strips. Leave about an inch of tape at the end to secure to the cap.
  5. Starting with the yellow, wrap the tape around the bottle cap by rolling it. Be sure not to catch the tape on the reflective paper.
  6. Repeat the process for the other bottle to make 2 jets.
  7. Tape the 2 jets together in the middle. Double-sided tape works well, or gaffer tape in a loop.
  8. Reinforce with 2 pieces of tape across the 2 jets. This will be the side of the jests against the child's back and won't be visible.
  9. Cut 2 thin strips of elastic for the child's arms to go through. Secure one piece of elastic to either side with 2 pieces of tape.
  10. Have your child strap on the jet pack and blast off. Just be back in time for supper!
Source: Full description with great pictures available from Sewing in No Man's Land
You have read this article 4th of July / bottle / space / summer / toy with the title March 2012. You can bookmark this page URL http://tangrila.blogspot.com/2012/03/rocket-jet-pack-bottle-craft.html. Thanks!

4th of July Posicle Stick Flag Magnet Craft

This is a great looking 4th of July Popsicle stick flag craft you can use as a refrigerator magnet. Perfect for Independence Day.

Materials:
  •  8 Popsicle sticks(craft sticks)
  • red, white, and blue paint, brushes
  • card stock or thin cardboard(cereal box)
  • scissors
  • glue
  • tape
  • small rhinestones, craft jewels, or beads.
  • magnet strip

Directions:

  1. Fist, cut a rectangle exactly the same size as the craft sticks lined up together.
  2. Beforehand, paint 4 Popsicle sticks red, and 4 white. Allow to dry. Or use pre colored craft sticks.
  3. Spread glue on the cardboard rectangle and glue on the Popsicle sticks in alternating colors. Allow to dry.
  4. Use tape to section off a small rectangle in the upper left corner of the flag. About 4 sticks and half the length is good.
  5. Paint the rectangle blue. Allow to dry.
  6. Glue on little rhinestones or jewels for stars. There don't have to be 50.
  7. Glue a magnet strip to the back and put on the refrigerator.
A correct flag has a red stripe at the top and bottom, but it doesn't have to be perfect.

Source: A Pumpkin and a Princess
 
You have read this article 4th of July with the title March 2012. You can bookmark this page URL http://tangrila.blogspot.com/2012/03/4th-of-july-posicle-stick-flag-magnet.html. Thanks!

Easy Sundial Paper Plate Craft

Here's an easy sundial paper plate craft. This came from the National Wildlife Federation.

Materials:

  • paper plate
  • plastic straw
  • sharp pencil
  • crayons
  • duct tape
  • sunny place
  • clock or watch


Directions:
  1.  Poke a hole in the center of a paper plate with a sharp pencil so the straw will go through.
  2. Turn the paper plate upside down. Write the number "12" on the edge of the paper plate.
  3. Use a ruler and draw a line from the 12 to the hole in the paper plate.
  4. Put the Straw in the hole and take the paper plate outside just before noon. Put it on the ground and slightly tilt the straw towards the line and 12 you drew.
  5. At exactly noon, turn the paper plate so the straw's shadow lines up with the line and the 12.
  6. Fasten the paper plate to the ground with duct tape or something else so it doesn't move. Have the kids predict what will happen an hour later.
  7. At exactly 1:00, mark the spot on the paper plate and write 1. Repeat this process every hour on the hour to make the clock.
  8. To use the sundial on subsequent days, it must be put in the same place in the same position.


Source: National Wildlife Federation
You have read this article nature / paper plate with the title March 2012. You can bookmark this page URL http://tangrila.blogspot.com/2012/03/easy-sundial-paper-plate-craft.html. Thanks!

Father's Day Daddy Sign Craft

Here's a pretty Father's Day sign craft that will bring a big smile to Daddy's face. Kids need a lot of help from an adult for this craft.

Materials:

  • 2 large sheets of card stock
  • various kinds of colorful paper, fabric, or old crafts
  • exacto knife or craft knife
  • cutting pad
  • masking tape
  • glue


Directions:

  1. Print out the Word "Daddy" in big block letters. If you can print out onto card stock, that's great. If not, carefully cut out letters. Then use a ruler or straight edge and trace them onto the card stock in a straight line.
  2. Lay the card stock on your cutting surface and use a sharp knife to carefully cut out the letters. Cut on the outside of the line to leave no lines on the paper.
  3. Collect scraps of colorful patterned paper like origami paper, old crafts or fabric. Choose a different design for each letter.
  4. Turn the card stock paper over. Cut each piece of colorful paper to fit behind each letter. Tape in place masking tape.
  5. Cover the back with one more, slightly smaller sheet of card stock like a sandwich. Tap or glue in place.
  6. Present your sign to Daddy.

You could do the same thing for Grandpa, too.

Source: Lovely Design
You have read this article collage / father's day with the title March 2012. You can bookmark this page URL http://tangrila.blogspot.com/2012/03/father-day-daddy-sign-craft.html. Thanks!

4th of July Kids Flag Craft

This simple 4th of July American flag is great for the youngest students for Independence Day.

Materials:

  • sheet of red construction paper
  • small rectangle of blue construction paper
  • white paint
  • glue
  • foam star stamps
  • sponges or fingers

Directions:

  1. Precut the blue fields for students or let them do it.
  2. Glue the blue field in the upper left corner of the red construction paper.
  3. Stamp stars onto the field with white paint.
  4. Use sponges or just fingers to paint white stripes on your flag.


You have read this article 4th of July / fingerpainting with the title March 2012. You can bookmark this page URL http://tangrila.blogspot.com/2012/03/4th-of-july-kids-flag-craft.html. Thanks!

April Fool's Day Card Craft

This simple April Fool's Day card craft will get a laugh or a groan out of your friend when they try to open it.

Materials:

  • greeting card
  • glue

Directions:

  1. Simply glue a greeting card or homemade card shut so it can't be opened.
  2. Give it to your friend.
  3. April Fools!
You have read this article April Fool's Day with the title March 2012. You can bookmark this page URL http://tangrila.blogspot.com/2012/03/april-fool-day-card-craft.html. Thanks!

April Fool's Day Spill Craft

This April Fool's Day Craft looks like spilled hot chocolate. Place it on the carpet and wait for your friend's reaction. Just say, "It wasn't me." and watch them laugh as they try to clean it up. This craft takes several days to dry, so start early.

Materials:

  • 1 Styrofoam or paper cup
  • tacky glue
  • brown acrylic paint
  • 1 plastic spoon
  • 3 small marshmallows
  • wax paper
  • paintbrush

Directions:

  1. Mix tacky glue with brown paint to look like hot chocolate.
  2. Paint the mixture inside the side of the paper cup.
  3. Lay the cup down on wax paper and pour or spoon the paint/glue mixture inside and around the outside of the cup to look like a spill.
  4. place a plastic spoon and 3 marshmallows on the spill. Allow to dry for 2 or 3 days.
  5. Carefully peel off the spill and set on the floor or table.
  6. April Fools!

Source: Being Crafty
You have read this article April Fool's Day with the title March 2012. You can bookmark this page URL http://tangrila.blogspot.com/2012/03/april-fool-day-spill-craft.html. Thanks!

Father's Day Toolbox Card

This Father's Day Toolbox Craft will surprise any DIY Daddy.

Materials:

  • red, black, and yellow construction paper
  • tools template
  • scissors
  • glue


Directions:

  1. Print out tools template and color tools.
  2. Trace and cut out handle and lock from black and yellow construction paper respectively.
  3. Fold a sheet of red construction paper into thirds so that the flap is a little shorter on top.
  4. Glue the the handle to the back and the lock on the front.
  5. Glue the tools inside the toolbox.
  6. Write "Happy Father's Day" on the front.

Variations:
If desired, you can glue an interesting design paper on the inside of the toolbox as shown on the website.
You could tape the sides of the bottom flap and middle together to make a pocket and place the tools inside.


You have read this article father's day with the title March 2012. You can bookmark this page URL http://tangrila.blogspot.com/2012/03/father-day-toolbox-card.html. Thanks!

Father's Day DAD Card Craft

Here's a simple Father's Day Card Craft that spells out DAD.


Materials:

  • sheet of card stock
  • "D", and "A" letter templates
  • markers
  • scissors
  • decorating materials, stickers, ribbon, etc.
  • ruler
  • exacto knife or box cutter

Directions:

  1. Find good block letter templates to spell the word, "DAD". If you can print out onto card stock, great. If not, cut out the templates and trace onto card stock.
  2. Trace the letters DAD onto a sheet of card stock. The letters should be the same size and should touch. Use a ruler so they are in a straight line. Cut out the word so the letters are stuck together. Use an exacto knife to carefully cut out the letter centers. Fold the word where the letters touch to make the card.
  3. Use a different colored marker to color each letter.
  4. Decorate with stickers, ribbon, etc.
  5. Present your card to Dad.


You have read this article father's day with the title March 2012. You can bookmark this page URL http://tangrila.blogspot.com/2012/03/father-day-dad-card-craft.html. Thanks!

Footprint Unicorn Horse Craft

Use a footprint to make this beautiful unicorn craft.

Materials:

  • sheet of construction paper
  • paints, brushes
  • glitter
  • black marker

Directions:

  1. Brush white pain onto child's foot and press at an angle onto a sheet of construction paper.
  2. Brush on white and blue paint for the mane and unicorn horn.
  3. Sprinkle on glitter if you like. Allow to dry.
  4. Draw details of the face with a black marker.
Variations:

Use the same idea to make a horse in brown for boys or even draw stripes on white for a zebra.

Source: Handprint and Footprint Art


You have read this article animals / footprints with the title March 2012. You can bookmark this page URL http://tangrila.blogspot.com/2012/03/footprint-unicorn-horse-craft.html. Thanks!

Father's Day Popsicle Stick Picture Frame Craft

Here's a simple Father's Day Picture frame using Popsicle sticks.

Materials:

  • big Popsicle sticks(craft sticks) or tongue depressors
  • paint
  • glue
  • tape
  • child's photo
  • stickers, dazzles, foam shapes, etc.
  • markers

Directions:

  1. Use colored craft sticks or paint your own beforehand.
  2. Glue 8 colored craft sticks together to make the frame, 2 at the top and bottom, and 2 on either side. You could make a frame with 6 instead, only one on the sides for a wider frame.
  3. Decorate your frame as you like. Add a Father's Day message, like "I love my Daddy".
  4. Tape a child's picture to the back of the frame. Crop the picture as necessary.
  5. Glue magnets to the back and put on the refrigerator.
  6. Or, glue 2 short wooden dowel lengths at the bottom on the back to make a stand up frame.
 Source: All Kids Network
You have read this article father's day / picture frame with the title March 2012. You can bookmark this page URL http://tangrila.blogspot.com/2012/03/father-day-popsicle-stick-picture-frame.html. Thanks!

Father's Day Hand Print Fish Craft

This Father's Day hand print craft will bring a big smile to daddy's face.

Materials:

  • sheet of blue construction paper
  • washable paints and brushes
  • child's hand
  • markers
 Directions:

  1. Beforehand, decide what kind of design or pattern you want for your fish.
  2. Use a brush and paint child's hand in the design you like.
  3. Press on to blue construction paper. Gently roll the child's hand over the paper for a good clear hand print.
  4. Wash hands and make bubbles with a finger dipped in white paint. Allow to dry.
  5. Use markers to draw a face on your fish. Draw seaweed or cut out from green paper and glue on. Write, "Happy Father's Day" at the top.

Source: Handprint and Footprint Art


You have read this article father's day / fish / hand print with the title March 2012. You can bookmark this page URL http://tangrila.blogspot.com/2012/03/father-day-hand-print-fish-craft.html. Thanks!

Father's Day Candy Guitar Craft

This Father's Day candy craft is a unique gift that keeps on giving. A way to a man's heart is through his stomach and Dad will be delighted to get this guitar covered in his favorite candy.

Materials:

  • white paper
  • pencil
  • scissors
  • large flat Styrofoam or thick cardboard.
  • gold foil or cellophane
  • brown construction paper
  • shiny string
  • ribbon
  • glue gun or other strong glue
  • lots of his favorite candy

Directions:

  1. Draw and cut out a simple guitar design from white paper to make your template. It's easier to draw half a guitar on the fold, cut out and unfold.
  2. Lay the template on a large flat piece of Styrofoam or thick cardboard and trace and cut out.
  3. Cover the whole guitar in gold foil or cellophane and tape or glue in the back.
  4. Cut out and glue on a brown circle where the hole in the guitar should be.
  5. This is the fun part! Use a glue gun with an adult or other glue to attach his favorite candies all over the guitar. It's creative and kind of like decorating a gingerbread house. You could even glue candies at the top of the neck for the knobs to adjust the strings. Don't eat up all the candies before you finish.
  6. If desired, glue on some shiny thread for the guitar strings and a long piece of ribbon for a guitar strap.

Variations:
You can go as simple or big on this as you want. Also, this idea could be used for other shapes. Instead of a guitar, make a piano, car, tennis racket, golf club, or hat. Whatever Dad's into


Source: Incredible Edible Crafts
You have read this article father's day with the title March 2012. You can bookmark this page URL http://tangrila.blogspot.com/2012/03/father-day-candy-guitar-craft.html. Thanks!

Father's Day Saw Card Craft

Dad Will never forget this Father's Day saw card craft with the message, "To the greatest Dad I ever saw.

Materials:

  • sheet of card stock
  • saw template
  • scissors
  • aluminum foil
  • tempura paints
  • permanent felt tip marker(sharpie)
  • glue

Directions:

  1. Print out trace the saw template onto the card stock or draw your own.
  2. Tape card stock onto a window and trace the saw shape onto the other side.
  3. Color the handle brown on both sides.
  4. Color the saw blade blue, grey, or brown on one side only.
  5. Place glue all over the inside of the blank saw side and lay a sheet of aluminum foil, shiny side up. Smooth out.
  6. Cut out the inside of the handle and the saw blade.
  7. Alternatively, instead of coloring, you could glue foil on the other side of the saw blade and trim off the excess.
  8. Write, "To The Greatest Dad I ever SAW" on one side with the permanent marker.
  9. Fold in the middle and write, "Happy Father's Day on the other side.
Source: That Artist Woman

You have read this article father's day / foil with the title March 2012. You can bookmark this page URL http://tangrila.blogspot.com/2012/03/father-day-saw-card-craft.html. Thanks!

Father's Day Trophy Candy Dish Craft 2

Here's a great Father's Day trophy craft that doubles as a candy dish.

Materials:
  • 1 paper cup
  • 1 paper bowl
  • card stock
  • gold or silver paint
  • construction paper
  • scissors
  • glue

Directions:

  1. Draw 2 half heart shapes from card stock for the trophy handles.
  2. Paint the cup, bowl, and handles gold or silver. Allow to dry.
  3. Place the cup upside down. Glue the handles on the sides and glue the bowl on top.
  4. Write "#1 Dad" on a piece of construction paper, cut out and glue to the front of the trophy.

You have read this article cups / father's day with the title March 2012. You can bookmark this page URL http://tangrila.blogspot.com/2012/03/father-day-trophy-candy-dish-craft-2.html. Thanks!

Father's Day Trophy Cup Craft 1


Make a Father's Day Trophy Craft from paper cups for the #1 Dad.

Materials:

  • 2 paper cups
  • masking tape
  • construction paper
  • gold paint
  • scissors
  • gold pipe cleaners(optional)
  • small box(optional)

Directions:

  1. Tape 2 paper cups together at the bottoms with masking tape.
  2. Paint completely with gold paint.
  3. Cut our 2 "D" shapes or 2 half heart shapes from construction paper for the handles. Paint gold the same as the trophy.
  4. Glue on the handles.
  5. Decorate you trophy an with the message, "#1 Dad"

Variations:
  1. Instead of making paper handles, poke 2 holes on either side of the top cup and insert gold pipe cleaners to make the handles. Tape in place on the inside.
  2. Paint a small box gold for a base and glue the trophy on top. Add a message to the base.


You have read this article cups / father's day with the title March 2012. You can bookmark this page URL http://tangrila.blogspot.com/2012/03/father-day-trophy-cup-craft-1.html. Thanks!