Occupations Collage Craft

This is a very simple idea to do aftger teahing about occupations and jobs. Make sure students understand what Mommy and Daddy's jobs are.

Materials:
  • old magazines
  • scissors
  • piece of construction paper
  • glue
  • trays

Directions:
  1. Cut out occupaton pictures from old masgazines; doctor, teacher, pilot, farmer, firefighter etc.
  2. Put onto trays and let students choose the ones they want.
  3. Glue onto a sheet of construction paper.

Variations:
You can make this an individual activity or put everything on 1 big sheet of paper for the class.
You have read this article collage with the title February 2012. You can bookmark this page URL http://tangrila.blogspot.com/2012/02/occupations-collage-craft.html?m=0. Thanks!

Daily Routines Collage Craft

This is a very simple idea to do aftger teahing about daily routines in the morning, afternoon, and night.

Materials:
  • old magazines
  • scissors
  • piece of construction paper
  • glue
  • trays

Directions:
  1. Cut out daily routine pictures from old masgazines; brush your teeth, comb your hair, take a bath, eat dinner, get dressed, go to bed, etc.
  2. Put onto trays and let students choose the ones they want.
  3. Glue onto a sheet of construction paper.

Variations:
You can make this an individual activity orput everything on 1 big sheet of paper for the class.
You could also make several collages and seperate morning, aternoon, and night routines
You have read this article collage with the title February 2012. You can bookmark this page URL http://tangrila.blogspot.com/2012/02/daily-routines-collage-craft.html?m=0. Thanks!

Easter Grass Egghead Craft

Here's a great Easter Egg activity that is also a gargening lesson. You can measure your eggheads daily and keep track of their growth.

Materials:

  • eggs
  • egg dye or paint
  • potting soil
  • grass seed
  • google eyes
  • glue
  • black marker
  • construction paper

Directions:

  1. Carefully break the top of an egg. Clean and allow to dry(Don't forget to eat the egg!)
  2. Paint or dye the egg tan, yellow, or pink(skin tone colors) Allow to dry.
  3. Cut strips of construction paper 1 inch or so thick. Decorate and then glue the ends together to make an egg stand.
  4. Carefully draw a face and add eyes on your egg.
  5. Fill with potting soil and sprinkle grass seed.

Variations:
  1. This is a great spring activity. You can measure their growth and make a chart.
  2. Do an experimnt; 1 egg gets no sun, 1 no water, 1 no air, 1 no soil and predict what will happen. Check daily and record the results.
  3. If desired, store all your eg heads together in an egg carton.
  4. You could make the egg carton look like a bus and the eggheads are the students.
  5. Don't forget to put each students' name on their egg.


You have read this article creature / Easter / spring with the title February 2012. You can bookmark this page URL http://tangrila.blogspot.com/2012/02/easter-grass-egghead-craft.html?m=0. Thanks!

Easy Paper Plate Fish Craft


This is as about as simple as it gets. This is a great fish craft from a paper plate. Adapt as you like.

Materials:

  • paper plate
  • construction paper scraps or other decorating materials
  • scissors
  • glue
  • google eye
  • paint(optional)

Directions:

  1. Cut about a 1 quarter piece from the paper plate.
  2. Glue to the back to make a tail.
  3. Glue on a eye and other decorations to make your fish.

Variations:
For more color, paint your paper plates beforehand and allow to dry.
You could glue on dazzles or sequence for scales. This is a great idea after reading the book, "The Rainbow Fish".
You have read this article fish / paper plate / rainbows / sea with the title February 2012. You can bookmark this page URL http://tangrila.blogspot.com/2012/02/easy-paper-plate-fish-craft.html?m=0. Thanks!

Stained Glass Easter Egg Craft

Here is a great looking Stained Glass Easter Egg Craft using card stock and tissue paper.

 Materials:
  • card stock
  • tissue paper in pastel Easter colors
  • scissors
  • glue
  • hole punch
  • ribbon

Directions:

  1. Cut an egg shape from card stock.
  2. Cut squares and triangles from various colored tissue paper.
  3. Cover with glue and put on the tissue paper.
  4. Glue the other side. Fold over the excess and put more tissue paper. Allow to dry.
  5. Punch a hole at the top. Tie a ribbon and hang up.

Variations:
You could also sprinkle on glitter.
To last longer, laminate your eggs.


You have read this article collage / Easter with the title February 2012. You can bookmark this page URL http://tangrila.blogspot.com/2012/02/stained-glass-easter-egg-craft.html?m=0. Thanks!

Easter Chick Egg Carton Cup Craft

These are adorable little Easter chick treat holders from an egg carton that are cute and fun to make. Give them as party favors at your next Easter party.

Materials:
  • egg carton
  • yellow paint
  • thick tape like carpet tape or duct tape
  • scotch tape
  • black marker
  • orange and yellow construction paper
  • scissors
  • glue

Directions:

  1. Carefully cut the cups from an egg carton.
  2. Put 1 cup on top of another and connect in the back with a strip of carpet tape or duct tape
  3. Paint everything yellow. Allow to dry.
  4. Cut little triangle beak pieces and feet from orange construction paper nd triangle wings from yellow.
  5. Tape 1 beak on the inside of the top and bottom cups nd 2 wings on the bottom cup
  6. Glue on the feet.
  7. draw eyes with a marker or use google eyes.
  8. Fill yur chicks with Easter candy.

Variation:
You could easily paint white, add ears and a couple of pom poms to make Easter Bunny cups.


You have read this article chicken / cups / Easter with the title February 2012. You can bookmark this page URL http://tangrila.blogspot.com/2012/02/easter-chick-egg-carton-cup-craft.html?m=0. Thanks!

Easter Chick Paper Plate Craft

Here's another variation of the Easter Chick Craft. This one is even easier, just use paper plates and no cutting circles.

Materials:

  • 1 big paper plate
  • 1 small paper plate
  • orange construction paper
  • small white circle with black iris/or big google eye
  • scissors
  • glue
  • yellow crayons or paint

Directions:

  1. Color or paint your paper plates yellow.
  2. Cut long skinny rectangles and 3 triangles(feet and beak) from orange construction paper.
  3. Glue the 2 paper plates together.
  4. Glue on legs, feet, beak, and eyes.
  5. Glue yellow feathers on the body and 1 on the head.(optional)
You have read this article animals / birds / chicken / Easter / paper plate with the title February 2012. You can bookmark this page URL http://tangrila.blogspot.com/2012/02/easter-chick-paper-plate-craft.html?m=0. Thanks!

Easter Egg Tree Craft

Here's a classic Easter craft. Make a simple 2D Easter egg tree with this template. Fun, easy, and colorful.

Materials:

  • Easter egg tree template
  • crayons
  • scissors

Directions:

  1. Print out the template. Color the tree and the eggs. Make the eggs as detailed or simple as you like.
  2. Cut out all the Easter eggs.
  3. Glue onto the tree.
  4. Glue the whole thing onto a piece of construction paper for a frame. (optional)
Alternative:

Make your own trunk by tracing the child's hand print and arm on brown construction paper and cut out.


Original template available from DLTK:
http://www.dltk-holidays.com/easter/meggtree.html

You have read this article Easter / hand print with the title February 2012. You can bookmark this page URL http://tangrila.blogspot.com/2012/02/easter-egg-tree-craft.html?m=0. Thanks!

Easter candy Carrot Craft

Here's a great paper carrot party favor to fill with candy. Basically, make a cone shaped carrot with grass at the top. Give them out at your next Easter party.
Materials:

  • sheet of orange construction paper
  • green construction paper
  • scissors
  • paper towel roll
  • tape

Directions:
  1.  Cut about an inch off the top of a paper towel roll.
  2. Cut a sheet of 8.5x11 sheet of orange costruction paper.
  3. Wrap the orange paper around the paper towel roll. Roll the bottom into a cone shape. The paper towel roll keeps the shape inside. Tape in place. Fold the paper over the top to make a lid.
  4. Cut the green paper into strips and make little loops and glue in place.
  5. Glue the strips to the top of the carrot. Allow to dry.
  6. Fill the carrot with candy and fold the top down again.
You have read this article Easter / food with the title February 2012. You can bookmark this page URL http://tangrila.blogspot.com/2012/02/easter-candy-carrot-craft.html?m=0. Thanks!

Easter Egg Photo Craft

Here's a great idea for to make a truly memorable Easter egg that's also photo frame.
Materials:

  • a raw egg, blown out
  • push pin
  • kids pictures
  • Scraps of colorful paper or cloth
  • glue
  • bush

 
Directions:

 
  1. Blow out an egg; poke 1 hole in each end with a push pin and blow into a bowl. Wash and allow to dry.
  2. Cut the face out of your kids' favorite photos and soak in water until soft.
  3. Glue the photos onto the egg.
  4. Paint the rest of the egg with glue and stick on paper or cloth scraps
  5. Put on another layer of glue and smooth down the edges. Allow to dry.
You have read this article Easter with the title February 2012. You can bookmark this page URL http://tangrila.blogspot.com/2012/02/easter-egg-photo-craft.html?m=0. Thanks!

Easter Egg Bee Craft

Here's a cute idea to turn an ordinary egg into a flying bee decoraion for Easter.

Materials:


  • raw egg
  • push pin
  • bowl
  • newsapaper
  • bottle cap
  • black, yellow, and red paint
  • tissue
  • glue
  • fishing line
  • needle
Directions:

  1. First, blow out your egg; poke a small hole in each end with a pushpin, hold over a bowl, and blow out the raw egg. Wash and allow to dry.
  2. Cover work surface with newspper. Paint your egg completely yellow. Place on a bottle cap to dry.
  3. Paint 2 thick, black stripes. Allow to dry.
  4. Using a toothpick, paint on a face, you might also use small google eyes.
  5. Cut a small oval from tissue paper, pinch in the middle, and glue on to your bee.
  6. Thread fishing line through a needle and push through the egg.
  7. Hang up your bee using both ends of the fishing line.
Original idea from Disney's Family Fun


You have read this article bugs / Easter with the title February 2012. You can bookmark this page URL http://tangrila.blogspot.com/2012/02/easter-egg-bee-craft.html?m=0. Thanks!

Easter Bunny Glove Puppet Craft

Here's a great idea to turn an old glove into a cute Easter bunny. There is no one way to do it. Some use the index and middle fingers to make the ears. Others fold the middle finger behind and use the index and ring fingers for ears. You can sew the fingers down or simply use a strong glue. Then you can glue on buttons, pipe cleaners, and pom poms for the face. Afterwards there are several things you an do with it; you can use it as a puppet or for a bottle or golf club cover. You could also fill with cotton, sew the bottom shut, add legs and make a stuffed toy or bean bag.
Let your imagination and creativity flow and have fun.

Here's a website with some ideas
http://tlc.howstuffworks.com/family/easter-crafts8.htm


You have read this article clothes / Easter / puppet with the title February 2012. You can bookmark this page URL http://tangrila.blogspot.com/2012/02/easter-bunny-glove-puppet-craft.html?m=0. Thanks!

St. Patrick's Day Rainbow Party Favor Box Craft

This is a great looking box to collect goodies at your next St. Patrick's Day party. It's made around a small box with craft foam. It takes many steps and is less of a classroom project than a home one, but the end result looks awesome.
Materials:

  • craft foam in rainbow colors
  • cotton balls
  • card stock
  • small box like a jello or crayon box
  • glue
  • ruler
  • clothespins
  • scissors
  • box cutter

Directions:

  1. Craft foam comes in sheets. Cut to 1/4 inch wide strips about 8-10 inches long.
  2. Cut a small rectangle from card stock. Cover with glue and line up the craft foam strips in rainbow order. Put a generous amount of glue on top and add a few cotton balls. It's maybe easier if you do both ends at the same time. Allow to dry.
  3. Take a small box like for jello. Trace the sides on green craft foam, cut out and glue to the box. Allow to dry.
  4. Put glue on the back of the card stock behind the clouds and attach to the sides of the box. Attach clothespins to hold in place. Allow to dry.
  5. If desired, add shamrock stickers or dazzles.

Original craft with lots of great pictures available from the 4 Crazy Kings website.

  
You have read this article party / rainbows / St. Patrick's Day with the title February 2012. You can bookmark this page URL http://tangrila.blogspot.com/2012/02/st-patrick-day-rainbow-party-favor-box.html?m=0. Thanks!

Rainbow Print Craft

This is a simple rainbow print idea that looks great. Also good for St. Patrick's Day. Kids turn half a rainbow into a whole one. The original craft called for freezer paper, but regularpaper is fine, too.

Materials:

  • large sheet of freezer paper or white paper, folded in half
  • paints in all the colors of the rainbow, dishes, brushes
  • glitter

Directions:

  1. Fold the paper in half and open.
  2. Show the kids how to paint half a rainbow on one half of the paper in the right order.
  3. Fold the paper over and press gently.
  4. Open again to see your rainbow print. Sprinkle on glitter while the paint is still wet.
You have read this article rainbows / St. Patrick's Day with the title February 2012. You can bookmark this page URL http://tangrila.blogspot.com/2012/02/rainbow-print-craft.html?m=0. Thanks!

St. Patrick's Day Rainbow Mobile Craft

Here's a really original and simple idea for a modern looking rainbow mobile. Also great for St. Patrick's Day. The mobile pictured uses construction paper strips. This is a good project to use scrap paper strips you're probably saving already. Or, I also like the idea of using craft sticks(Popsicle sticks). You can buy colored craft sticks or paint your own.

Materials:

  • construction paper in rainbow colors or craft sticks(Popsicle sticks) in rainbow colors
  • string or white thread
  • 2.5 inch Styrofoam ball
  • gold glitter
  • glue
  • tape
  • scissors

Directions:

  1. Cut thin rectangular strips from paper in rainbow colors. The mobile pictured used 8.5x1 inch strips. Or use craft sticks.
  2. Brush glue all over the Styrofoam ball and cover in glitter. Allow to dry.
  3. Tape the strips or sticks along a piece of string or white thread in the order of the rainbow.The mobile pictured used 4 strips for each color.  Leave about an inch between each strip. Leave a generous amount of extra string at both ends.
  4. Thread the needle on the purple end and push all the way through the center of the gold glitter ball. Tie the bottom.
  5. Hang the other end up.


You have read this article mobile / rainbows / St. Patrick's Day with the title February 2012. You can bookmark this page URL http://tangrila.blogspot.com/2012/02/st-patrick-day-rainbow-mobile-craft.html?m=0. Thanks!

Rainbow Paper Plate Wreath

This is a beautiful rainbow wreath craft using a paper plate ring and pom poms. This could also be good for St. Patrick's Day.

Materials:

  • paper plate
  • pom poms of the colors of the rainbow, red, orange, yellow, green, light blue, dark blue, and purple. (various shades also look good)
  • scissors
  • glue
  • hole punch
  • string
  • rainbow ribbon

Directions:

  1. Beforehand, cut the middle out of a paper plate.
  2. Punch a hole at the top
  3. Glue pom poms all along the ring in the order of the rainbow, Roy G. Biv.
  4. Glue a rainbow ribbon to the bottom. Allow everything to dry.
  5. Tie a string at the top and hang up.

You have read this article paper plate / rainbows / spring / St. Patrick's Day / wreath with the title February 2012. You can bookmark this page URL http://tangrila.blogspot.com/2012/02/rainbow-paper-plate-wreath.html?m=0. Thanks!

St. Patrick's Day Hand Print Rainbow Craft

This is a fabulous looking pot of gold with a hand print rainbow.

Materials:

  • sheet of white paper
  • sheet of green construction paper
  • black construction paper
  • white crayon, paint pen or white out pen
  • paint in the colors of the rainbow, dishes, brushes
  • gold foil chocolate coins
  • scissors
  • glue

Directions:

  1. Beforehand, trace and cut out a simple pot shape from black construction paper.
  2. Write "Happy St. Patrick's Day" with a white pen.
  3. With brushes, paint child's fingers and palm with each color of the rainbow in order. There are 6 simple colors to a rainbow, but only 5 fingers, so you can make the last one dark blue or purple. Or you could put just a little blue between the last 2 fingers.
  4. Press their hand onto white paper near the corner.
  5. Glue on foil coins from chocolates under the rainbow.
  6. Glue on the pot under and slightly covering the coins. Allow to dry.
  7. For a frame, glue the paper on a sheet of green construction paper.
You have read this article hand print / rainbows / St. Patrick's Day with the title February 2012. You can bookmark this page URL http://tangrila.blogspot.com/2012/02/st-patrick-day-hand-print-rainbow-craft.html?m=0. Thanks!

Rainbow Streamer Craft

This is a great, simple idea for a rainbow craft, also good for St. Patrick's Day.

Materials:

  • paper plate
  • scissors
  • streamers or ribbon in red, orange, yellow, green, blue, and purple
  • glue or tape
  • hole punch
  • string
  • scissors
  • yellow construction paper(optional)

Directions:

  1. Cut out the center from a big paper plate to make a ring with the rim.. It's easier if you fold it gently and make a big slit in the middle to cut out.
  2. Cut streamers to the same length, about 18" inches or longer.
  3. Wrap around the ring and tape or glue to the ring in the correct Roy G. Biv order.
  4. Punch a hole at the top and tie a string to hang up.
  5. Another good idea is to make a sun from yellow paper and glue onto the inside of the ring.(optional)


You have read this article paper plate / rainbows / spring / St. Patrick's Day with the title February 2012. You can bookmark this page URL http://tangrila.blogspot.com/2012/02/rainbow-streamer-craft.html?m=0. Thanks!

Hand Prints Rainbow Craft

Here's a great idea to make a big rainbow on the bulletin board with all the students hand prints. This is also a great decoration for St. Patrick's Day.

Materials:

  • construction paper for each color in the rainbow
  • pencil
  • scissors
  • glue

Directions:
  1. Teach the kids about the colors of the rainbow, ROY G. BIV. To simplify, you can combine the last 2 into purple.
  2. Have students trace their hands on different colored paper and cut out. Be sure to put students' names.
  3. Glue to a large sheet of bulletin board paper or put on the wall direct.

As an alternative, use paint instead of construction paper to make the hand prints.
You have read this article hand print / rainbows / St. Patrick's Day with the title February 2012. You can bookmark this page URL http://tangrila.blogspot.com/2012/02/hand-prints-rainbow-craft.html?m=0. Thanks!

St. Patrick's Day Leprechaun Toilet Roll Craft

This cute little Leprechaun is made from a toilet paper roll and is so much more fun and creative than printing out a template and gluing on. Let your kids imaginations go.

Materials:

  • 1 toilet paper roll
  • green construction paper
  • green and cream coloed paint
  • scissors
  • glue
  • red yarn

Directions:
  1. Paint the toilet roll green and allow to dry.
  2. place the toilet roll on a piece of green paper and trace the circle. Draw a bigger circke around this and cut out the douhnut shape. This will be placed on the Leprechaun's head fo a hat.
  3. Paint a cream colored face. Allow to dry.
  4. Draw details on the face.
  5. Cut red yarn into short lengths and glue on for a beard.
  6. Cut little strips of green with cream paint a the ends for arms nd glue on. How cute.
Original idea from Momments of Mommyhood
    You have read this article St. Patrick's Day / toilet paper roll with the title February 2012. You can bookmark this page URL http://tangrila.blogspot.com/2012/02/st-patrick-day-leprechaun-toilet-roll.html?m=0. Thanks!

    St. Patrick's Day Leprechaun Hat Craft

    Here's how you can make your own Leprechaun hat for St. Patrick's Day.

    Materials:

    • green and orange construction paper
    • gold paper
    • scissors
    • tape

    Directions:

    1. Take a large sheet of green construction paper and wrap it around your head to size and tape in the back to secure.
    2. Place the cylinder on another piece of green paper and trace the circle. This will be the inside of the brim.
    3. Draw a larger circle around the smaller one. Cut out. Don't forget to cut some tabs in the center, to fold up into the cylinder.
    4. Tape the tabs in place on the inside of the cylinder to attach the brim.
    5. Glue on a strip of orange paper for the hat band.
    6. Cut a old square and cut out the inside to make the gold buckle. Glue in place.

    Of course, you can wear your hat, or put on a false top and use it for a Leprechaun trap. After catching your Leprechaun, make him tell you where his gold is.
    You have read this article clothes / costume / St. Patrick's Day with the title February 2012. You can bookmark this page URL http://tangrila.blogspot.com/2012/02/st-patrick-day-leprechaun-hat-craft.html?m=0. Thanks!

    St. Patrick's Day Leprechaun Trap Craft Idea

    How to make a Leprechaun trap or how to catch a Leprechaun. How about do something different for St. Patrick's Day? Everyone knows about leprechauns, wee little men who hide pots of gold at the end of the rainbow. According to legend, if you capture a leprechaun, you can force him to show you where his gold is hidden. I think this is a fabulously fun idea, great for a family activity at home. Designing your trap is half the fun. Use chocolate gold coins as bait. It can be as simple as a box propped p with a stick, or make it elaborate like the mouse trap game. Start with a base of wood or cardboard. Make a cup that falls on top of him, or a bottle he falls into. Don't forget to make it look all green and beautiful. Here are some great ideas for Leprechaun traps. Good hunting and may the luck of the Blarney be with you.

    Local Fun for Kids
    Design Decor
    About.com's Leprechaun Traps
    Family Fun
    You have read this article St. Patrick's Day with the title February 2012. You can bookmark this page URL http://tangrila.blogspot.com/2012/02/st-patrick-day-leprechaun-trap-craft.html?m=0. Thanks!

    St. Patrick's Day Shamrock Sprouts Craft

    Here's a great idea that's both a St. Patrick's Day craft and a gardening lesson.

    Materials:

    • compressed sponge
    • shamrock template
    • scissors
    • fast sprouting seeds like alfalfa or bean sprouts
    • tin pan or plate
    • plastic wrap

    Directions:
    1. Find a nice shamrock template or simpl draw your own. Trace and cut out a big shamrock from a sponge.
    2. Wet the sponge and squeese out the excess water.
    3. Place on a tin pan and put a little water.
    4. Cover the tp with seeds and place in a sunny place.
    5. Hopefully, in a few days, the seeds will sprout to make a fuzzy, living shamrock.
    6. Keep the sponge moist. At night, lightly cover with plastic wrap to prevent drying.

    If you choose the right seeds, it can also be a nutrition lesson. Pull up the sprouts and put on a salad.
    You have read this article St. Patrick's Day with the title February 2012. You can bookmark this page URL http://tangrila.blogspot.com/2012/02/st-patrick-day-shamrock-sprouts-craft.html?m=0. Thanks!

    Paper Bag Fish Craft

    Here's a simple idea to make a pretty fish from a paper lunch bag. Decorate with whatever you have available.

    Materials:

    • paper lunch bag(plain or colored)
    • old newspaper for stuffing
    • big google eyes
    • pipe cleaner or yarn foe a mouth
    • decorating materials; sequins, glitter glue, dazzles, markers, etc.
    • glue

    Directions:

    1. Use a colored paper lunch bag or paint a plain one ahead of time.
    2. Stuff the paper bag halfway with crumpled up newspaper.
    3. Pinch in the middle and tie with a rubber band or pipe cleaner.
    4. Decorate the outside of your fish.
    You have read this article fish / paper bag / sea / summer with the title February 2012. You can bookmark this page URL http://tangrila.blogspot.com/2012/02/paper-bag-fish-craft.html?m=0. Thanks!
    St. Patrick's Day Leprechaun Mirror Craft

    This is a great idea for St. Patrick's Day. Whomever looks into the magic mirror will be transformed into a leprechaun.

    Materials:

    1. break proof mirror about 4-5 inches wide
    2. Craft foam of various colors; black, orange, yellow, light green, dark green(you could substitute construction paper or felt just fine, I think)
    3. templates(see below)
    4. scissors
    5. glue

    Directions:

    1. Print out all the templates and cut out all pieces of appropriate colors.
    2. Glue onto the mirror with a window in the middle as shown.
    3. Gaze into your magic mirror.
    Leprechaun mirror templates available from Disney's Family Fun Website
    You have read this article St. Patrick's Day with the title February 2012. You can bookmark this page URL http://tangrila.blogspot.com/2012/02/st-patrick-day-leprechaun-mirror-craft.html?m=0. Thanks!

    Easter Bunny Chick Goodies Cup Craft

    These cute bunny and chick Easter goodies cups are a great and simple idea for your next Easter Party. Fill them with all your Easter chocolates.

    Bunny Cup

    Materials:

    • 1 white paper cup
    • pink and white construction paper
    • white pipe cleaner
    • small pink pom pom
    • 2 big google eyes
    • scissors
    • glue

    Directions:

    1. Cut bunny ears from white paper with pink inside and glue to the back of the cup.
    2. Cut 2 lengths of pipe cleaner and tie in the middle to make the whiskers. Glue to the front of the cup.
    3. Glue a pink pom pom on top for a nose and glue on 2 google eyes.
    4. Fill with Easter grass.

    Easter Chick

    Materials:

    • 1 yellow paper cup
    • orange pipe cleaner
    • orange paper triangle
    • 2 google eyes
    • glue
    • scissors
    Directions:
    1. Twist 2 small orange pipe cleaners together to make tiny feet with three toes. Glue to the bottom of the cup.
    2. Glue on 2 google eyes and an orange triangle for a face.
    3. Fill with yellow craft feathers.


    You have read this article cups / Easter with the title February 2012. You can bookmark this page URL http://tangrila.blogspot.com/2012/02/easter-bunny-chick-goodies-cup-craft.html?m=0. Thanks!
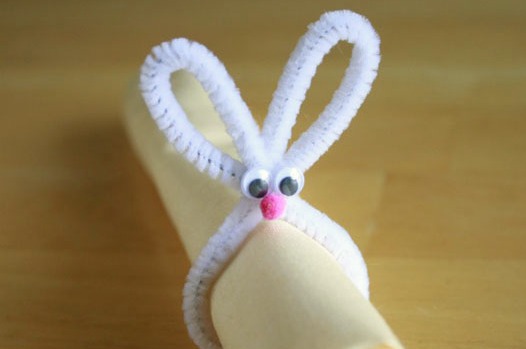
    Easy Easter Bunny Napkin Holder Craft

    Here's an adorable Easter Bunny napkin holder for your next party. Just takes a few minutes to make. You're guests will never forget.

    Materials:

    • 1 white pipe cleaner
    • 2 google eyes
    • 1 very small pink pom pom
    • 1 small white pom pom
    • glue

    Directions:

    1. Make a small loop in the white pipe cleaner and twist. The two long ends will be sticking up. This loop is for the napkin.
    2. Fold down the ends and twist around the center to make the bunny's ears.
    3. Glue on the google eyes and pink pom pom nose.
    4. Glue the white pom pom on the back at the bottom of napkin loop for the tail. Allow to dry.


    You have read this article Easter with the title February 2012. You can bookmark this page URL http://tangrila.blogspot.com/2012/02/easy-easter-bunny-napkin-holder-craft.html?m=0. Thanks!

    Easter Lamb/Sheep Paper Plate Craft

    This fat sheep craft reminds me of Shirley from "Shaun the Sheep". It's a nice Easter craft using a paper plate and cotton balls.

    Materials:
    • 1 paper plate
    • cotton balls
    • 1 oval with an ear sticking up for the head from black construction paper or felt
    • 2 rectangle legs from black construction paper or felt
    • 1 small ribbon
    • 1 google eye
    • glue

    Directions:

    1. Put glue all over the paper plate and put cover with cotton balls.
    2. Glue the head and leg pieces to the back.
    3. Glue on a ribbon and google eye.
    You have read this article Easter / paper plate / sheep / spring with the title February 2012. You can bookmark this page URL http://tangrila.blogspot.com/2012/02/easter-lambsheep-paper-plate-craft.html?m=0. Thanks!

    Easter Spring Lamb Clothespin Craft

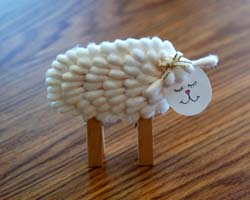
    Here's a cute Easter lamb craft using Q-tips and clothespins. It's great for a card holder at your next Easter or sprng party. This takes some manual dexterity and is better for older kids.

    Materials:

    • 1 oval from card stock, about 4 inches long for the body
    • 1 small oval from card stock, about 1.5 inches long for the head
    • lots of Q-tips(cotton swabs)
    • 2 clothespins
    • tiny ribbon
    • glue
    • scissors
    • pen or pencil

    Directions:

    1. Beforehand, cut th tips off Q-tips about 2 inches long.
    2. Put glue all over the boy piece and starting from the back, arange the Q-tips in a pattern as shown. Add more glue on the ends of each  layer as you go along. Leave a space at the end for the head.
    3. Draw a face on the small oval.
    4. Glue Q-tips and ribbon on the head as shown.
    5. Glue the head on the body. Allow everything to dry.
    6. Glue 2 clothespins on the back for legs.


    You have read this article clothespin / Easter / sheep / spring with the title February 2012. You can bookmark this page URL http://tangrila.blogspot.com/2012/02/easter-spring-lamb-clothespin-craft.html?m=0. Thanks!

    Easter Chick Standing Felt Craft

    Here's an adorable felt chick craft standing on pipe cleaner legs. Perfect for your Easter party tabletop display.

    Materials:

    • 2 big yellow felt ovals about 4.5 in diameter for the body(template available from the website)
    • 1 small yellow felt oval about 2.5 inches in diameter for the wing
    • 1 small orange felt triangle for the beak
    • 1 orange pipe cleaner, 7 inches long for the legs
    • 2 orange pipe cleaner pieces, 2 inches long for the toes.
    • 2 google eye
    • glue
    • 1 small yellow feather(optional)

    Directions:

    For the legs:
    1. Bend a 7 inch orange pipe cleaner in half and twist at the top into a wishbone shape.
    2. Twist  a 2 inch long orange pipe cleaner around each end to make the toes.

    Body:
    1. Glue the legs and the orange triangle beak to 1 yellow felt oval.
    2. Glue the other felt oval on top to make a sandwich.
    3. Glue the small yellow felt oval on top for the wing. Don't glue down completely, leave a flap sticking up.
    4. Glue on a google eye on each side of the head.
    5. Glue a small piece of yellow feather at the top of the head or between the felt ovals(optional)
    6. Prop up your Easter felt chick and adjust the legs to stand on its own.

    The template is available at the original Disney's Family.com website.

    You have read this article animals / birds / chicken / Easter / spring with the title February 2012. You can bookmark this page URL http://tangrila.blogspot.com/2012/02/easter-chick-standing-felt-craft.html?m=0. Thanks!
    Easter Chick Paper Craft

    Here's an easy and cute Easter chick paper craft that's also a lesson about shapes.

    Materials:
    • 1 sheet of construction paper for a background
    • 1 large yellow construction paper circle
    • 1 slightly smaller yellow construction paper circle
    • 3 small triangles and 2 thin rectangles from orange construction paper
    • yellow and white craft feathers
    • small yellow pom poms
    • scissors
    • glue
    • 1 big google eye

    Directions:

    Glue the orange rectangles and triangles at the bottom of the background paper for legs.
    Glue the big yellow circle on top of the legs and the smaller one on top for a head.
    Glue on yellow feathers and maybe 1 white and yellow pom poms on the body.
    Glue the triangle beak and google eye on the head.
    Look at your chicks and go over all the shapes students see.


    You have read this article animals / birds / chicken / Easter / shapes with the title February 2012. You can bookmark this page URL http://tangrila.blogspot.com/2012/02/easter-chick-paper-craft.html?m=0. Thanks!

    Easter Bunny Cotton Ball Craft

    This is an absolutely adorabl Easter bunny craft kids can't keep their hand off.

    Materials:

    • half a paper plate
    • lots and lots of cotton balls
    • white and pink pipe cleaners
    • pink construction paper
    • pink pom pom
    • 2 big google eyes
    • white glue

    Directions:

    1. Put glue all over the half paper plate and put on a layer of cotton balls. Then put glue and put another layer. Slowly build your cotton ball mountain. Allow to dry.
    2. Draw 2 large ear shapes with glue on pink construction paper. Bend and put white pipe cleaners over the glue. Allow to dry and cut out.(It's so much easier to cut out after putting on the pipe cleaners.)
    3. Glue the ears to the back of the paper plate.
    4. Glue on a pink pom pom and eyes on the face.
    5. Bend a small piece of pipe cleaner for a mouth and glue on.


    You have read this article animals / Easter with the title February 2012. You can bookmark this page URL http://tangrila.blogspot.com/2012/02/easter-bunny-cotton-ball-craft.html?m=0. Thanks!

    Easter Bunny Hand Print Craft

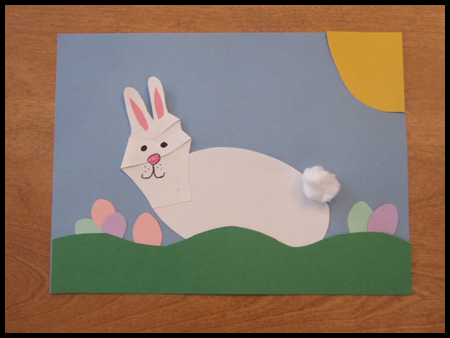
    Here's an ingenious idea for an Easter Bunny scene using a hand print to make the bunny's head.


    Materials:

    • 1 sheet of blue constructon paper
    • various other colors of construction paper
    • white card stock
    • markers
    • glue
    • scissors
    • cotton ball
    • pencil

    Directions:

    1. First, trace a hand onto white card stock and cut out.
    2. Fold down the thumb and last 2 fingers so you have a peace sign. Glue fingers down in place. This is the bunny's head.
    3. Cut 2 thin ovals of pink paper and glue onto the bunny's ears.
    4. Draw a face with markers. (It might be easier to use the back of the hand print for the face and ears.)
    5. Cut a large oval from card stock for the body and glue near the bottom of the blue sheet of construction paper.
    6. Cut a wavy green strip for grass and glue on top of the body.
    7. Glue on the head, make sure the ears stand up from the paper for a 3D effect.
    8. Glue on a cotton ball tail.
    9. Cut and glue on oher details like a sun, eggs, basket, tree, etc.


    You have read this article animals / Easter / hand print with the title February 2012. You can bookmark this page URL http://tangrila.blogspot.com/2012/02/easter-bunny-hand-print-craft.html?m=0. Thanks!

    Easter Bunny Styrofoam Ball Craft

    Here's a cute little Easter Bunny made from 2 styrofoam balls.

     
    Materials:

    •  1 large styrofoam ball
    • 1 small styrofoam ball
    • white and pink pipe cleaners(bumpy pipe cleaners if you have them)
    • 1 toothpick
    • white glue
    • 1 pink pom pom
    • 2 google eyes
    • black thread
    • scissors
    • pink felt
    • black permnent marker

    Directions:
    1.  Take the big Styrofoam ball and push it down firmly against a hard surface to make it flat on the bottom.
    2. Put glue on one en of a toothpick and stick it halfway, straight down into the styrofoam ball.
    3. Put glue on the other end and put on the smaller ball on top. This is the head.
    4. Cut an oval shape from pink felt and glue on the front of the body.
    5. Take one white pipe cleaner and fold it down into a little paw shape. Stick the pointy end into the styrofoam to secure. (The original craft called for bumpy pipe cleaners, but I think you can use reglar ones, too)
    6. Do the same to make the other paw, 2 fet, and a tail.
    7. Put a white and pink pipe cleaner together and fold on half, with the pink on the inside. Make an ear shape. Twist the ends together and stick down into the styrofoam. Make anoher ear and do the same.
    8. Take three lengths of black thread about 3 inches long and tie in the middle to make the whiskers. Glue to the front of the face. You can brush a little glue, so the whikers stick to the sides of the face.
    9. Glue a pink pom pom on top of the knot of the whiskers.
    10. Glue on 2 google eyes.
    11. Draw a little mouth under the pom pom.

    If it's easier, prepare the head and body pieces seperately an stick them together at the end.


    You have read this article animals / Easter with the title February 2012. You can bookmark this page URL http://tangrila.blogspot.com/2012/02/easter-bunny-styrofoam-ball-craft.html?m=0. Thanks!

    Easter Bunny Paper Mache Pinata Craft

    This is a cute Easter Bunny paper mache craft I found online. It can be done simply as a display, or fill it with candy for a pinata As with all paper mache projects, it's very important that it completely dry before applying the next layer, usually about 24 hours. For these kinds of projects, I usually make 3 layers. This will take several days to complete. Students could work on it a little each day over the week. Paper mache is messy and wet. Be sure students wear smocks and cover your work area, but NOT with newspaper. It will stick to your balloon. Use a big plastic tarp if you can.

    Materials:
    • 1 large balloon
    • newspaper
    • flour
    • water
    • large bowl
    • cotton
    • white and pink construction paper
    • big google eyes
    • black pipe cleaners
    • scissors
    • glue

    Directions:

    1. Beforehand, tear newspaper into lots of strips.
    2. Blow up and tie your balloon.
    3. Mix flour and water in a large bowl to make the glue.
    4. Dip newspaper strips in the glue and completely cover the balloon. Allow to dry completely before applying the next layer(Usually, the next day)
    5. Apply 2 more layers of paper mache
    6. Paint the balloon white.
    7. Cut out and glue on big ears and feet. Put some pink in the center of the ears. The narrow part of the balloon is the top.
    8. Glue some cotton on the front for the lips.
    9. Glue on a pink pom pom for a nose.
    10. Glue on black pipe cleaners for whiskers.
    11. Glue on 2 big google eyes.
    12. Finally, pop the balloon. Display or fill with Easter candy.


    You have read this article Easter / pinata with the title February 2012. You can bookmark this page URL http://tangrila.blogspot.com/2012/02/easter-bunny-paper-mache-pinata-craft.html?m=0. Thanks!

    Easter Basket Hand Print Craft

    This is a really cute Easter egg basket from paper, with hand prints for a handle. It could be a simple class project for a bulletin board display

    Materials:

    • various colored construction paper
    • pencil
    • scissors
    • tape

    Directions:
    1. Draw a large hat shape on brown construction paper and cut out. Cut a slit in the middle of the hat.
    2. Trace and cut out hand prints in various Easter pastel colors. You need about 9-10 hand prints for each basket.
    3. Also, trace and cut out lots of colorful Easter eggs.
    4. Tape the backs of the hand prints together in an arc for the basket handle and tape to the back of the basket.
    5. insert the Easter eggs through the slit and tape in place on the back.
    6. Hang up your basket.

    You have read this article Easter with the title February 2012. You can bookmark this page URL http://tangrila.blogspot.com/2012/02/easter-basket-hand-print-craft.html?m=0. Thanks!

    Easter Hand Print Lamb Craft

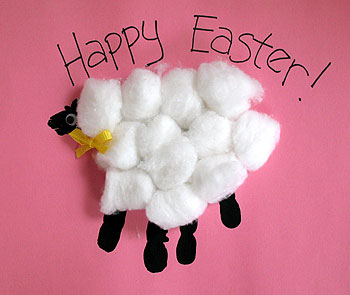
    Here's a simple cotton ball Easter lamb using a hand print for a body.

    Materials:

    • 1 sheet of pink construction paper(blue is OK, too.
    • cotton balls
    • black paint
    • 1 google eye or eye sticker
    • glue
    • little bow ribbon

    Directions:
    1. Paint students hand with black paint and press onto pink paper. The thumb will be the head and the fingers will be the legs.
    2. Draw 2 little black ears on the head.
    3. Add a google eye.
    4. Pour glue all over the lamb's body.
    5. Stick on cotton balls, with the black feet showing t the bottom.
    6. Glue on a little bow for a collar.
    7. Write the words "Happy Easter" above the lamb.
    8. If desired, draw a background; sun, grass, trees, Easter eggs, etc

    You have read this article Easter / hand print / sheep with the title February 2012. You can bookmark this page URL http://tangrila.blogspot.com/2012/02/easter-hand-print-lamb-craft.html?m=0. Thanks!

    Ankylosaurus Dinosaur Craft

    This is a simple an cute dinosaur craft I did using a paper bowl as the base. The inspiration comes from a similar paper bowl turtle craft.

    Materials:
    • paper bowl
    • brown paint
    • orange and brown construction paper
    • white glue
    • 1 acorn
    • tape
    • scissors

    Directions:

    1. Beforehand, paint the bottom of a paper bowl completely brown. Allow to dry.
    2. From orange construction paper, cut lots of little triangles for ankylosaurus' spikes. Also cut a head, a triangle with 2 more small triangles sticking out on the sides to make 4 little horns for the face.
    3. From brown construction paper, cut a long, triangular shaped tail with an oval shape at the end for a club. Also cut out 4 simple, elephant like feet. Don't forget to draw little toes.
    4. Tape the fet and tail to the inside of the paper bowl, so they stick out the sides.
    5. Glue the little triangles in three rows going down the back and also sticking out along the rim on both sides.
    6. Draw a face on the head and glue to the front.
    7. Use white glue to attach an acorn to the oval club tail for a 3D touch.

    I originally envisioned using sunflower seeds down the back instead of paper triangles. I also thought of using acorn top all over the back for armour. Let your imagination go.
    You have read this article dinosaurs / paper plate with the title February 2012. You can bookmark this page URL http://tangrila.blogspot.com/2012/02/ankylosaurus-dinosaur-craft.html?m=0. Thanks!

    St. Patrick's Day tissue paper shamrock Craft

    Here's a great looking fuzzy, 3D shamrock using crumpled up green tissue paper. Perfect for St. Patrick's Day.

    Materials:

    • sheet of white construction paper or card stock
    • pencil
    • shamrock template(tracing 3 hearts works well)
    • green tissue paper in shades of green(a little white is OK, too)
    • green crayon
    • glue
    • scissors

    Directions:

    1. Trace a shamrock onto white construction paper or card stock. Using a heart shape works well.
    2. Cut tissue paper into 2x2 inch squares.
    3. Cover 1 leaf with glue.
    4. Crumple up tissue squares and put onto the leaf.
    5. Repeat the process for the other leaves.
    6. color the stem with a green crayon.
    Here's the raft form the original Gummy Lump website

    You have read this article collage / St. Patrick's Day with the title February 2012. You can bookmark this page URL http://tangrila.blogspot.com/2012/02/st-patrick-day-tissue-paper-shamrock.html?m=0. Thanks!

    St. Patrick's Day Pot of Gold and Rainbow Craft

    I absolutely loved this idea when I saw it. It's fairly simple and makes a fantastic looking little pot of gold complete with rainbow for St. Patrick's Day

    Materials:

    • Paper or Styrofoam bowl
    • black paint
    • paint brushes
    • aluminum foil
    • white glue
    • gold glitter
    • pipe cleaners of every color of the rainbow
    • foam egg or cotton balls

    Directions:
    1. Paint the inside and outside of a Styrofoam or paper bowl black and allow to dry.
    2. Take a large piece o aluminum foil and crumple up into a flattened ball to fill the bowl.
    3. Take another sheet of aluminum foil and gently wrap it around the first ball and place in the black pot.
    4. Mix white glue and gold glitter in a separate bowl and using a paint brush, paint all over the top of the aluminum foil. It should be thick. Also, if you have glitter glue, you could draw circles for coins on top. Allow to dry.
    5. Meanwhile, put together the pipe cleaners in ROY G. BIV order to make your rainbow. Tie one end with another pipe cleaner to secure. Stick the other ends into a foam egg or cotton balls.
    6. Put the tied end of the rainbow into the pot under the gold. If desired, glue in place.


    You have read this article paper plate / rainbows / St. Patrick's Day with the title February 2012. You can bookmark this page URL http://tangrila.blogspot.com/2012/02/st-patrick-day-pot-of-gold-and-rainbow.html?m=0. Thanks!

    St. Patrick's Day Easy Pot of Gold Craft

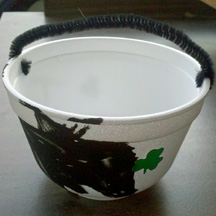
    This is a very easy Pot of gold craft to collect your gold coin chocolates on St. Patrick's Day.

    Materials:

    • Styrofoam bowl
    • black paint and brushes
    • sharp pencil
    • long, black pipe cleaner
    • shamrock stickers

    Directions:

    1. Paint a Styrofoam bowl black, inside and out. Allow to dry
    2. Take a sharp pencil and poke 2 holes at the top.
    3. Tie the ends of a black pipe cleaner through the holes to make a handle.
    4. Stick on shamrock stickers.
    5. Fill with gold coins and hide under the rainbow.
    You have read this article St. Patrick's Day with the title February 2012. You can bookmark this page URL http://tangrila.blogspot.com/2012/02/st-patrick-day-easy-pot-of-gold-craft.html?m=0. Thanks!

    St. Patrick's Day coffee filter shamrock Craft

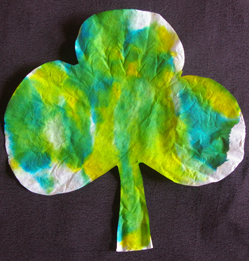
    This is a great looking shamrock for Sr. Patrick's Day that also helps teach about mixing yellow and blue to make green.

    Materials:

    • coffee filters
    • blue and yellow food coloring
    • water and cups
    • medicine droppers, Q-tips, cotton balls, or paint brushes

    Directions:

    1. Beforehand, cut shamrock shapes from coffee filters.
    2. Mix yellow and blue food coloring with water in separate cups.
    3. Use medicine droppers or other things to drop or dab blue and yellow onto the filter to make green.

    You have read this article St. Patrick's Day with the title February 2012. You can bookmark this page URL http://tangrila.blogspot.com/2012/02/st-patrick-day-coffee-filter-shamrock.html?m=0. Thanks!

    St. Patrick's Day Hand Print Wreath #3 Craft

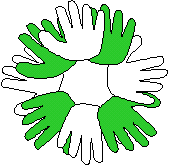
    This is a simple idea to make a St. Patrick's Day wreath from students hand prints to simulate shamrocks. It might be better as a class project and make one big wreath for the classroom.

    Materials:
    • green(2 shades would be great) and white construction paper
    • pencil
    • scissors

    Directions:

    1. Trace students hand onto green and white paper and cut out.
    2. Glue all the hand prints together to for a wreath.
    3. If desired, glue on gold coins either, foil from chocolate coins or circles cut from yellow paper.
    You have read this article hand print / St. Patrick's Day / wreath with the title February 2012. You can bookmark this page URL http://tangrila.blogspot.com/2012/02/st-patrick-day-hand-print-wreath-3-craft.html?m=0. Thanks!