Hanging Laundry Clothes Paper Craft

Here's a cute summer craft to show laundry hanging outside. Good for a unit on clothing or weather.

Materials:

  • 1 sheet of blue construction paper
  • 2 craft sticks(Popsicle sticks)
  • length of string
  • various clothes cut from paper
  • paper sun
  • cotton balls
  • tape
  • glue

Directions:

  1. Give each child a few paper clothes cut outs to color.
  2. Tape a length of string across the blue construction paper so it actually hangs or prepare it beforehand.
  3. Tape 2 craft sticks on either side of the string to look like a clothes line.
  4. Tape or glue clothes to the string. (an ideal template would have little paper tabs t the top to fold over the string like clothespins)
  5. Glue on a sun and cotton ball clouds in the sky.


You have read this article clothes / summer with the title October 2011. You can bookmark this page URL http://tangrila.blogspot.com/2011/10/hanging-laundry-clothes-paper-craft.html. Thanks!

Permanent Sand Castle Craft

This is a fun permanent sand castle craft, good to do after an excursion to the beach.

Materials:

  • sand
  • water
  • paper plate
  • flour
  • sugar
  • pot
  • spoon
  • stove
  • small paper bowls, shapes, pudding cups, etc.
  • decorations, sea beads, small shells, etc.

Wheat Paste recipe:
  1. Combine 1/3 cup of flour and 2 tbsp. of sugar in a saucepan.
  2. Slowly pour 1 cup of water, while stirring.
  3. Stir over low heat until the mixture thickens. (makes 1 cup)

Directions:

  1. Combine 6 cups of sand with one cup of wheat paste. (recipe below)
  2. Add water until the mixture is sticky and packs firmly into shapes.
  3. Press mixture into bowls or other shapes.
  4. Place the shapes onto a paper plate.
  5. Add accents like shells, beads or a toothpick flag. Allow to dry overnight.


You have read this article beach / sand craft / sea / summer with the title October 2011. You can bookmark this page URL http://tangrila.blogspot.com/2011/10/permanent-sand-castle-craft.html. Thanks!

Felt Clothes Paper Doll Craft

This is a simple idea for a felt clothes paper doll craft for a lesson on clothing.

Materials:

  • paper doll cut from card stock
  • various clothing items cut from felt; shirt, pants, hat, shoes, etc.
  • tape or glue

Directions:

  1. Prepare all materials beforehand.
  2. Introduce all he different types of clothing.
  3. Hand out a paper doll to each student.
  4. Have students choose clothes to dress their doll.
  5. For a permanent take home craft, they can apply clothes with glue.
  6. Or,  use tape and keep the dolls in the classroom to dress up again and again.
  7. Students can draw a face on their doll.
  

You have read this article clothes with the title October 2011. You can bookmark this page URL http://tangrila.blogspot.com/2011/10/felt-clothes-paper-doll-craft.html. Thanks!

Autumn, Fall Leaf Stick Craft

Here's a very simple and colorful leaf craft using finger painting. This is a good activity following a nature walk or lesson on Autumn leaves.

Materials:

  • real leaves for a model
  • maple or other leaf shape from thick, white paper or construction paper
  • craft stick
  • Autumn color paints, red, yellow, orange, and green
  • tape

Directions:

  1. After a nature walk or favorite autumn book, look at some real leaves and talk about the colors.
  2. Pass out the leaf shapes and put different color paints on the tables in shallow dishes.
  3. Have the kids take turns dipping their fingers in paints and color the leaf. Many autumn leaves still have green and green is good for contrast. Allow to dry.
  4. After drying, tape a craft stick to the back to make a handle. Don't forget to put students names on their craft.
These leaves are good for daning to a leaf or autumn song.


You have read this article fall / fingerpainting / leaves / tree craft with the title October 2011. You can bookmark this page URL http://tangrila.blogspot.com/2011/10/autumn-fall-leaf-stick-craft.html. Thanks!

Autumn, Fall Tree Paper Craft

Here's a simple Autumn, Fall tree craft.

Materials:

  • large paper circle (The inside part of a paper plate works well)
  • red, yellow, and orange leaf shapes from construction paper
  • brown construction paper trunk shape
  • a few real leaves
  • craft stick
  • glue
  • tape

Preparation:

Beforehand, have the kids collect different kinds of leaves from outside.
Cut all pieces from construction paper or kids can do some cutting depending on age and abilities.

Directions:

  1. Glue leaf shapes to the white circle.
  2. Glue trunk to the circle.
  3. Tape a craft stick to the back of the trunk for support.
  4. Glue on a few real leaves. Done.

You have read this article fall / leaves / tree craft with the title October 2011. You can bookmark this page URL http://tangrila.blogspot.com/2011/10/autumn-fall-tree-paper-craft.html. Thanks!

Big Number Math Paper Craft

This easy craft also reinforces math concepts for small children.

Materials:

  • 1 piece of white construction paper with large number template
  • matching number cut out from colored construction paper
  • various letter, number, or other dazzles for decoration
  • glue
 Directions:

After reviewing numbers, give each child a white piece of paper with number template and a number cut out.
Glue number to the matching template on the white paper.
Decorate your number.


You have read this article math with the title October 2011. You can bookmark this page URL http://tangrila.blogspot.com/2011/10/big-number-math-paper-craft.html. Thanks!

"Big Green Monster" Paper Craft

This is a fun craft as a follow up activity to accompany the popular book "Go Away Big Green Monster" by Ed Emberley.
If you have a copy of the book, this craft is easy. The book shows a green monster face that slowly appears and then disappears. The pages have the holes in them that makes the perfect stencil template. Depending on the age and abilities of your children, you may want to cut out all the pieces yourself beforehand.

Materials:

  • Copy of the book "Go Away Big Green Monster"
  • green, blue, purple, red, white, and yellow construction paper
  • scissors
  • pencil
  • sheet of black construction paper
  • glue

Directions:

  1.  For each part of the face, use the pages in the book to trace over each color of construction paper.
  2. Cut out all the pieces of the face. head, mouth, teeth, nose, ear, eyes, and hair.
  3. Glue on all the pieces to assemble the face on a piece of black construction paper.


You have read this article halloween / monster with the title October 2011. You can bookmark this page URL http://tangrila.blogspot.com/2011/10/green-monster-paper-craft.html. Thanks!

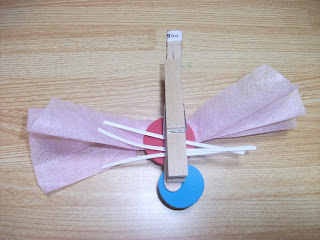
Dragonfly Craft Stick Craft

Here's a cute dragonfly craft.

Materials:

  • 1 craft stick or Popsicle stick
  • two foam circles, one big, one small
  • a piece of tissue paper folded accordion style
  • 3 short lengths of plastic cord or pipe cleaners
  • 2 google eyes
  • 1 clothes pin
  • tape
  • glue
Directions:

  1. Glue two foam circles on the top of a craft stick to make the body and head.
  2. Tape the folded tissue paper on top to make the wings.
  3. Tape three pieces of plastic cord or pipe cleaners to the bottom to make the legs.
  4. Glue or tape a clothes pin to the bottom to display easily.
  5. Glue the eyes on the head.
Alternatives:

Use a small plastic bag pinched in the middle for the wings.


You have read this article animals / bugs with the title October 2011. You can bookmark this page URL http://tangrila.blogspot.com/2011/10/dragonfly-craft-stick-craft.html. Thanks!

Easy Butterfly Tissue Craft


This is a very easy butterfly, perfect for running and flying around the room.

Materials:
  • craft tissue paper of various colors
  • scissors
  • pipe cleaner(wiki stick)

Directions:
  1. Cut out peanut or "8" shapes from tissue paper in various colors.
  2. Give each child two different colors and sandwich together.
  3. Pinch in the middle, and twist with a pipe cleaner. Stand up the ends to make the antennae.
  4. Sing your favorite butterfly song and let the kids dance around the room flying their butterflies.
You could also attach one to the end of a string and then a long stick and let the kids chase your butterfly as you fly it over their heads, like a fishing rod.


You have read this article animals / bugs / butterfly with the title October 2011. You can bookmark this page URL http://tangrila.blogspot.com/2011/10/easy-butterfly-tissue-craft.html. Thanks!

Paper Elephant Stand-up Craft

This is a cut elephant craft that stands on the table.

Materials:

  • piece of construction paper
  • markers
  • scissors
  • rectangular piece of felt
  • decorations like paper stars, stickers, dazzle shapes
  • glue
  • tape
  • short piece of yarn
 Directions:

  1. Fold a piece of construction paper in half.
  2. Use an elephant template or free hand draw an elephant shape starting at the fold.
  3. Cut out the elephant so you have two identical shapes attached at the top. Do not cut the fold.
  4. Cut two fan shape pieces for the ears.
  5. Glue the pieces on either side of the head and fold back to make the ears.
  6. Glue on a piece of felt over the top to make the elephant's saddle.
  7. Glue decorations on the saddle.
  8. draw on eyes.
  9. On the inside, tape a piece of string for the tail.
You could have each child make an elephant of a different color and then line them up to make a circus parade. You could use the same concept for different animals.

You have read this article animals / elephant with the title October 2011. You can bookmark this page URL http://tangrila.blogspot.com/2011/10/paper-elephant-stand-up-craft.html. Thanks!

Colorful Pasta Counting Craft

This is a fun and easy craft that is also part of a math lesson.

Materials:

  • various kinds of pasta(theme kids pasta is great)
  • various colored paints
  • piece of construction paper
  • marker
  • white glue
Preparation:
Beforehand paint different kinds of pasta in bright colors and let dry.
Draw circles each piece of construction paper.

Directions:

  1. Review counting with the children until the target number(in this case 5). Each paper has 5 circles.
  2. Pass out a piece of paper with circles to each child.
  3. Show them the colorful pasta and place them on the table in shallow dishes.
  4. Have each child practice by taking 5 of each kind of pasta, counting as they do. Alternatively. if you pass out the prepared number of each pasta to the kids have them all count the pasta out loud to check.
  5. Have them glue the same kind of pasta into the circles counting as they do. Allow to dry.
  6. Display you math art.
The same activity can be done with other numbers or other cute, countable objects.


You have read this article math / pasta with the title October 2011. You can bookmark this page URL http://tangrila.blogspot.com/2011/10/colorful-pasta-counting-craft.html. Thanks!

Shapes Collage Paper Craft


Here's a very simple shapes craft to do with very small kids, 2-3 years old, after a lesson on basic shapes.
Materials:
  • 1 large square of white construction paper
  • various colored construction paper shapes
  • glue
Directions:
  1. Beforehand, prepare various colored paper shapes.
  2. After reviewing shape names, have students glue on the large white square.
For more challenge, have them match color shapes to shape outlines on the white paper.
Or, have them make a design with the shapes like a train, car, or rocket. Let your imagination go, but be sure to always show a good example or model. You could also use this activity to review colors at the same time.
You have read this article collage / math / shapes with the title October 2011. You can bookmark this page URL http://tangrila.blogspot.com/2011/10/shapes-collage-paper-craft.html. Thanks!

Handprint Flower Mother's Day Craft

Here's a cute hand print flower craft that makes a great Mother's Day gift.

Materials:

  • white construction paper
  • green construction paper
  • red tempura paint
  • scissors
  • glue
  • "I love You" message

Directions:

  1. Beforehand, cut out enough green stems and leaves for each child from green construction paper.
  2. Press children's hands into red paint and make a hand print on white paper.
  3. Cut out hand print.
  4. Glue hand print, leaves and "I love you message to stem
  5. Laminate for strength.(optional)


You have read this article flowers / hand print / mother's day with the title October 2011. You can bookmark this page URL http://tangrila.blogspot.com/2011/10/handprint-flower-mother-day-craft.html. Thanks!

Shapes Foam Stamp Craft

Here's a simple craft for teaching preschoolers about shapes.

Materials:

  • felt pen
  • box cutter
  • blocks of hard foam to make stamps
  • white craft paper
  • paint
Directions:

Stamps
  1. Beforehand, take small blocks of hard foam. Use a felt pen to draw geometric shapes on one side.
  2. Use a box cutter to carefully cut around the shapes, leaving the opposite side of the block intact.

Craft
  1. Give each child a piece of paper and let them take turns dipping the stamps in paint and pressing them to the paper.
  2. For more of a challenge, have them try to make a design with the shapes like a train, rocket or car.


You have read this article math / shapes with the title October 2011. You can bookmark this page URL http://tangrila.blogspot.com/2011/10/shapes-foam-stamp-craft.html. Thanks!

Easy Sand Bottle Craft


This is a fun and easy craft to do after a trip to the beach.

Materials:

  • 1 small plastic drink bottle with cap (PET bottle)
  • sand
  • small shells or beads
  • funnel
  • blue paint or food coloring (optional)

Directions:

  1. Use a funnel to put some sand in the bottom of a cleaned out plastic bottle.
  2. Fill the the bottle with water.
  3. Drop in a few small shells or beads.
  4. Put in a few drops of blue food coloring to look like the ocean. (optional)
  5. Twist the cap on tightly.
  6. Shake and watch the sand settle to the bottom.
 Prep and Maintenance

If you use real beach sand instead of craft sand, you should wash the sand first. There are two ways:
1. Wash all the and beforehand in a big bucket.-hard
2. Put some sand in the bottle. Fill with water about halfway. Secure lid and shake vigorously. Unscrew lid and pour out water. repeat 3 or 4 times.-easy

Don't put too much sand, just enough to cover the bottom. If  you put too much, you won't be able to see the shells when they settle, they'll sink. The beads are a little lighter. I had beach theme beads that looked great.

One version of this craft called for hot-gluing the cap. I don't recommend that. First, it's not necessary. A tight twist of the cap is enough. Second, I noticed after a few weeks, the water started to get mucky. No problem. Take off the cap and pour out the water. Refill and replace cap and shake vigorously. Repeat a few times. It all depends how long you plan on keeping it. If you change the water from time to time, it should keep indefinitely. Have fun.
You have read this article beach / bottle / sand craft / sea with the title October 2011. You can bookmark this page URL http://tangrila.blogspot.com/2011/10/easy-sand-bottle-craft.html. Thanks!

Chicken Puppet Handprint Craft


This is a cute chicken puppet craft, great for a lesson on farm animals.

Materials:

  • large white circle on hard paper (the middle of a paper plate works well)
  • red construction paper
  • pencil
  • two small triangles for the beak
  • google eye or eye sticker
  • craft stick
  • scissors
  • glue
  • tape
Directions:

  1. Trace the children hands o the red construction paper and cut out.
  2. Glue on eye and beak on the front of the circle.
  3. Glue the hand prints on the back of the circle to make the crest as shown.
  4. Tape the craft stick to the back to make your puppet.
This puppet could be used to practice the sound of a rooster or chicken like in the song "Old MacDonald" or it could be used in a play like "The Little Red Hen".

 
You have read this article animals / chicken / hand print / puppet with the title October 2011. You can bookmark this page URL http://tangrila.blogspot.com/2011/10/chicken-puppet-handprint-craft.html. Thanks!

Easy Pig Collage Paper Craft


This is a cute pig craft to do with your students. It's good for a unit on spring or animals.

Materials:

  • pig template cutout on white construction paper
  • 1 big black circle for the eye and two small black circles for the nose
  • pink and/or other construction paper scraps
  • glue
Directions:

  1. Cut out pig template
  2. Glue on black eyes and nose
  3. Glue on pink paper scraps on the body


You have read this article animals / collage with the title October 2011. You can bookmark this page URL http://tangrila.blogspot.com/2011/10/easy-pig-collage-paper-craft.html. Thanks!

Easy Spring Sheep Paper Craft

Here's a fun sheep craft for spring.

Materials:

  • construction paper sheep cut out
  • cotton balls
  • glue

Directions:

  1. Prepare a simple sheep template and copy on construction paper. (This template came from the Crafts for all Seasons book, but any coloring page sheep is good, too.)
  2. Precut sheep or have students cut depending on their abilities.
  3. Glue on cotton balls for wool.
  4. Display your spring sheep.

You have read this article animals / sheep / spring with the title October 2011. You can bookmark this page URL http://tangrila.blogspot.com/2011/10/easy-spring-sheep-paper-craft.html. Thanks!

Shapes Train Paper Craft

This is a simple craft for very little kids to reinforce math concepts of geometric shapes.

Materials:

  • 1 piece of white paper
  • 1 set of white paper shapes, rectangle, triangle, square, and two circles
  • 1 set of color construction paper shapes that match
  • glue
Directions:

  1. You will have to cut out all the shapes beforehand. The shapes need to be exact. This activity is about matching shapes, not developing fine motor skills with scissors.
  2. Show each shape and review the names together.
  3. Show the kids how to glue the white template shapes on the paper to make a train shape.
  4. Help them find the matching shapes from a dish and glue them on top to match.
  5. Display your math trains.
(floating jellyfish drawing not necessary)

Using the basic concept, you could adapt it to making other pictures with shapes; make a longer train, a castle, a car, a rocket, let your imagination run wild. You could make big shape pictures and use for a seasonal or unit display on the bulletin board or above the chalkboard.


You have read this article math / shapes with the title October 2011. You can bookmark this page URL http://tangrila.blogspot.com/2011/10/shapes-train-paper-craft.html. Thanks!

Sunflower Paper Collage Craft


This is a fun and easy sunflower craft that has a neat, 3D effect.

Materials:

  • sunflower template
  • 1 piece of white paper
  • green construction paper
  • strips of yellow tissue paper
  • brown tissue paper or brown paper scraps
  • glue
Directions:

  1. Prepare sunflower template for each child.
  2. Cut stem and leaf shapes from green construction paper.
  3. Glue stem and leaves onto the white paper.
  4. Glue white sunflower to the top of the stem.
  5. Roll up yellow tissue paper into tiny balls and glue onto the petals of the flower.
  6. Glue on scraps of brown paper or tissue paper for the middle of the flower.

Variations:

You could glue real sunflower seeds into the center of the flower or at the bottom. You could use blue construction paper for the background and students put details like ground and sun.


You have read this article collage / flowers / summer / sunflowers with the title October 2011. You can bookmark this page URL http://tangrila.blogspot.com/2011/10/sunflower-paper-collage-craft.html. Thanks!

Fruit Paper Craft


This is a great idea to develop creativity for older students. No templates! You could pre-cut a few pieces for examples. Just let their imaginations run wild. This is for students with good motor and scissor skills, but you could simplify it for younger ones. The top picture shows  a watermelon, a persimmon, and chestnuts. The bottom picture shows grapes, an orange, and a strawberry. Details like seeds can be drawn with a pencil.

Materials:

  • 1 piece of white paper like printer paper or art paper
  • many pieces of multicolor paper (origami paper is good)
  • scissors
  • glue
  • pencil
  • examples
 
Directions:

  1. Give each student a paper plate and have them write their name on it.
  2. Show them good examples and how to cut the various shapes.
  3. Glue onto the white paper.
 The grapes are made with many individual purple circles. You could adapt this idea for vegetables or other every day objects. Have fun.


You have read this article food / fruit / spring / summer with the title October 2011. You can bookmark this page URL http://tangrila.blogspot.com/2011/10/fruit-paper-craft.html. Thanks!

Paper Horse Fingerpainting Craft


This a very simple craft for the youngest students or babies. Good for developing motor skills and a unit on animals or horses.

Materials:

  • 1 horse cut-out on card stock.
  • brown paint

Directions:

  1. Cut out the horse beforehand.
  2. Students paint the horse with brown paint using their fingers. Allow to dry.
No two horses will look the same. Don't forget to put student's names on the back first. Display on the wall or bulletin board.


You have read this article animals / fingerpainting with the title October 2011. You can bookmark this page URL http://tangrila.blogspot.com/2011/10/paper-horse-fingerpainting-craft.html. Thanks!

Mother's Day Flower Picture Frame Craft

This is a simple and cute picture frame you can make from a paper plate that's also great for a Mother's Day gift.

Materials:

  • 1 paper plate
  • many small pink and yellow construction paper oval shapes
  • 1 long green pipe cleaner or wiki stick
  • two small green leaf cut outs
  • tape
  • glue
  • scissors.

Directions:

  1. Beforehand, cut out the center of the paper plate, the pink and yellow ovals, and the green leaf shapes.
  2. Students glue the ovals all around the back side of the paper plate for the petals.
  3. Tape the green pipe cleaner to the back of the plate for the stem and fold down the tip. (the tip of a pipe cleaner can be a little sharp)
  4. Tape the green leaves to the stem.
  5. Tape the child's favorite photo to the back of the plate.
How to cut out the center of the paper plate:

One way is to take a box cutter and cut all the way around the inside circle of a paper plate. Another easy way, is to bend the paper plate in half without folding it. Then with scissors, make a cut from the center until the rim. Use that starter cut to cut out the center in two half circle pieces. Easy.


You have read this article flowers / mother's day / paper plate / picture frame with the title October 2011. You can bookmark this page URL http://tangrila.blogspot.com/2011/10/mother-day-flower-picture-frame-craft.html. Thanks!

Easy Father's Day Dog Paper Craft

Here is a very easy dog face craft that can be adapted to make a Father's Day gift.

Materials:

  • 1 large, square piece of colored paper
  • 2 google eyes
  • 1 small black circle for the nose
  • Father's day note on separate paper
  • crayons
  • colorful stickers or other decorations
Directions:

  1. Fold the large piece of paper in half diagonally to make a large triangle.
  2. Fold the corners down at an angle to make the ears.
  3. Glue on eyes and nose. Draw a mouth.
  4. Decorate the ears with the Father's day message and stickers, glitter, etc. Woof, Woof!
You have read this article animals / father's day with the title October 2011. You can bookmark this page URL http://tangrila.blogspot.com/2011/10/easy-father-day-dog-paper-craft.html. Thanks!

Easy Sea Life Paper Plate Craft


Here is a simple sea life craft that gives the impression of being under water or looking through a window.

Materials:
  • 1 paper plate
  • various sea life shape cut outs
  • yellow sun or bird shapes
  • blue tempura paint
  • glue
  • black marker
  • Saran wrap
  • tape
 Directions:
  1. Cut out sea animal shapes beforehand.
  2. Draw a line with a marker a little above the middle of the paper plate
  3. Paint everything blue below the line.
  4. Stick on the sea animal shapes. Allow to dry.
  5. Glue on sun or bird shapes at the top.
  6. Cover the whole paper plate with Saran wrap and tape on the back. 


You have read this article animals / paper plate / sea / summer with the title October 2011. You can bookmark this page URL http://tangrila.blogspot.com/2011/10/easy-sea-life-paper-plate-craft.html. Thanks!

Easy Paper Flowers Craft


 This is a very easy craft that my daughter invented by herself. She had a lot of origami paper and made snowflake like shapes for flowers. She was also the photographer.

Materials:

  • white paper
  • square origami paper in various colors
  • green construction or colored paper
  • scissors
  • glue or tape

Directions:

  1. Fold a piece of origami paper in half and then half again. Fold diagonally to make a triangle (actually, you can fold it any old way you like)
  2. Take scissors and cut out little shapes like triangles or squares. Make any little cuts you like.
  3. Unfold and glue or tape to the top of a piece of white paper.
  4. Cut a long green stem and two little leaf shapes and glue under the flower.
  5. Draw details with crayons like sun, trees, birds, bugs, etc. (optional)
 I like this craft because it's so simple and no two flowers will look the same. It lets students create something unique. Have fun. 
You have read this article flowers / spring with the title October 2011. You can bookmark this page URL http://tangrila.blogspot.com/2011/10/easy-paper-flowers-craft.html. Thanks!

Easy Turtle Paper Bowl Craft

Here's an easy and cute turtle craft using a paper bowl.
Materials:
  • 1 small paper bowl
  • 1 big and 4 smaller drop shape cutouts from blue or green paper for the head and legs
  • short, thin strips of brown and black construction paper to make the shell pattern
  • 2 google eyes or eye stickers
  • green paint
  • tape
Directions:
  1. Cut out the head and leg shapes.
  2. Paint the bottom of the paper bowl green.
  3. Stick on strips of brown and black while the paint is wet to create a shell pattern look. Allow to dry.
  4. Tape the head and leg pieces to the inside of the bowl.
  5. Add two eyes. Done!


You have read this article animals / paper plate with the title October 2011. You can bookmark this page URL http://tangrila.blogspot.com/2011/10/easy-turtle-paper-bowl-craft.html. Thanks!

Reindeer Paper Bag Craft

Here's a cute reindeer bag for kids to collect all their Christmas goodies.

 
Materials:
brown paper lunch bag
brown construction paper reindeer head cutout
2 white circles for eyes
2 small black circles for pupils
white construction paper or card stock for hand prints
large red nose cutout
scissors
glue

Directions:

  1. Trace and cut out the children's hands on the white paper.
  2. Cut out reindeer, nose, and eye pieces.
  3. Open the paper bag and glue the reindeer head cutout on the inside, sticking up.
  4. Glue on the hand prints to the back of the head to make antlers.
  5. Glue on the eyes.
  6. Glue on the red nose to the front of the paper bag.
 
You have read this article christmas / hand print / paper bag / reindeer with the title October 2011. You can bookmark this page URL http://tangrila.blogspot.com/2011/10/reindeer-paper-bag-craft.html. Thanks!

Lion Mask Paper Craft

Here's a great-looking lion mask craft that's great for your next class party. The template comes from the Arts and Crafts For All Seasons series of books by The Mailbox, http://www.themailbox.com/

Materials:
  • lion mask template on card stock paper
  • narrow leaf shape cutouts of various colors for the mane
  • 4 rubber bands
  • glue
  • yellow crayons
  • hole punch
  Directions:
  1. Cut out the lion mask template.(You may have to help the children cut it out, especially the eyes)
  2. Punch one hole on each side with a hole punch.
  3. Color the mask yellow.
  4. Glue leaf shapes around the back side for the mane.
  5. Tie one rubber band through each hole and tie on one more rubber band to loop over their ears.
You have read this article animals / halloween / lion / mask / nature with the title October 2011. You can bookmark this page URL http://tangrila.blogspot.com/2011/10/lion-mask-paper-craft.html. Thanks!

Halloween Owl Collage Paper Craft


Owls are part of the Halloween tradition. Huge yellow eyes peering at you from dark trees, ever watchful. Here's a simple and fun owl craft for Halloween.

Materials:
  • large blue construction paper rectangle
  • black construcion paper owl cut-out
  • 2 yellow circles for eyes
  • 1 small orange triangle for the beak
  • small paper squares of various colors( orange, brown, yellow, blue, etc)
  • glue
  • scissors
  • markers
Directions:
  1. Glue the paper owl to the blue background.
  2. Glue on the eyes and beak.
  3. Glue on multi-colored squares to the body for feathers.
  4. Draw circles around the eyes and pupils.
  5. Draw details like owl feet, branches, clouds, moon, etc.

You have read this article animals / halloween with the title October 2011. You can bookmark this page URL http://tangrila.blogspot.com/2011/10/halloween-owl-collage-paper-craft.html. Thanks!